Lighting at scale: Bringing hundreds of dynamic lights to mobile with Unreal MegaLights
Explore how Unreal Engine MegaLights brings scalable many-light rendering to mobile, delivering 5× higher performance than deferred shading
By Owen Wu

Rendering hundreds of dynamic, shadow-casting lights has traditionally been beyond the practical budget of mobile GPUs, especially when hardware ray tracing is involved. With Lumilings, a content demo targeting our new flagship Mali-G1 mobile GPU, we evaluate how far Unreal Engine(UE) MegaLights can push many-light rendering on a device with power and bandwidth constraints.
In Lumilings, MegaLights drives more than 190 shadow-casting dynamic point lights with ray-traced visibility on Mali-G1. This article describes the changes we made to Unreal Engine, the engine and project settings that MegaLights requires on mobile. It also looks at the key performance characteristics and practical lessons we observed while integrating MegaLights into Lumilings.
MegaLights introduction
MegaLights is a new stochastic many-light direct lighting system in Unreal Engine. It minimizes per-pixel cost by evaluating only a small number of primary lights selected through importance-driven sampling with temporal feedback. When ray-traced visibility is enabled for these primary lights, MegaLights reduces reliance on shadow maps and SDF shadows while remaining fully compatible with Lumen.
Efficient light sampling
MegaLights supports a large number of dynamic lights in a scene without a proportional increase in performance cost. This is achieved by capping the number of lights fully evaluated per pixel or screen tile.
With ray-traced shadows enabled, MegaLights uses importance-driven stochastic sampling with temporal feedback to select only the few most influential lights per screen tile (Primary Lights). It performs ray-traced visibility tests exclusively for these primary lights. Only this small subset receives full lighting and ray-traced shadow evaluation, MegaLights can replace traditional shadowing methods for primary lights, such as shadow maps. This architecture keeps the ray cost per pixel strictly limited to the primary-light budget, which is often just a few rays per pixel. As a result MegaLights can efficiently handle extremely complex many-light scenes on low-power, bandwidth-constrained GPUs such as Arm Mali.
When a screen tile is influenced by only a few lights, MegaLights evaluates all of them. However, if the number of affecting lights exceeds the shading budget, MegaLights allocates most of the budget to lights that the importance heuristics identify as the most likely contributors. As a Monte Carlo estimation technique, MegaLights models the full light contribution via probability distribution. It uses temporal accumulation across frames to average out stochastic noise and converge to the correct final radiance. This selection is stabilized across frames using temporal history. MegaLights may also periodically re-evaluate inactive or occluded lights to ensure the importance data remains responsive to scene changes.
This adaptive selection process is guided by both static heuristics and stochastic sampling with temporal feedback, ensuring stable light selection while avoiding unnecessary randomness. Primary lights receive full shading in every frame. This produces stable many-light illumination at the cost of only a few fully evaluated, ray-traced primary lights per pixel.
Comparison with ReSTIR
MegaLights draws inspiration from ReSTIR’s use of temporal importance feedback, but the two techniques address different problems using different methods. ReSTIR relies on stochastic resampling of ray-traced lighting samples; in its optimization loop, each candidate visibility check typically requires a shadow ray, leading to a potentially high overall Rays-Per-Pixel (RPP) budget for high-quality results.
Instead, MegaLights uses importance-driven stochastic sampling with temporal feedback to select a small, fixed set of primary lights, performing ray-traced visibility only for these lights and approximating all remaining lights at low cost. This keeps RPP low, typically between 1 and 4, regardless of scene complexity. As a result, MegaLights remains highly efficient on low-power, bandwidth-constrained GPUs such as Arm Mali.
Constant lighting cost
MegaLights draws a fixed number of light samples per pixel. As a result, the per-pixel lighting and ray-tracing cost remains approximately constant for a given r.MegaLights.NumSamplesPerPixel value, even as the total number of lights in the scene increases. The number of visibility rays per pixel is limited by the sampling budget rather than growing with the number of overlapping lights.
The trade-off is that stochastic variance increases when many lights compete for a limited sample budget. As the number of candidate lights increases, each individual light is sampled less frequently, so noise takes longer to converge. In contrast, traditional deferred shading evaluates every relevant light per pixel, which keeps lighting quality stable. However, computational cost increases roughly linearly with the number of active lights.
This constant per-pixel cost makes MegaLights well-suited to real-time rendering on power- and bandwidth-limited platforms, where maintaining stable frame times is as important as achieving high visual fidelity. The remaining dependence on light count comes primarily from the per-tile importance evaluation step, which we discuss in more detail in the next section.
Impact of light count on performance
MegaLights can handle far more dynamic lights than a traditional deferred shading system however, its cost is not completely independent of light count. Before MegaLights can sample a small number of primary lights, the system must evaluate the importance of all lights that influence a screen tile. As a result, the cost of computing importance scales approximately linearly with the number of lights affecting each tile.
This cost is typically much lower than the full shading cost of evaluating every light, but it still contributes to total frame time. When too many lights overlap within the same region, the per-tile importance evaluation step grows proportionally, which can become a measurable bottleneck in extreme many-light scenarios. We will examine this behavior in more detail in a later section.
How to enable Megalights for mobile
MegaLights does not yet have official mobile support in Unreal Engine however, you can enable it on ray-tracing-capable mobile devices for experimental or forward-looking projects. The engine modifications described here are based on the UE 5.7 branch. If you are using a later version of UE, the source files that need to be modified may differ, but you can apply the same concept to the corresponding engine source files.
Before modifying the engine, make sure that you have a sufficiently capable test device. The device must support Vulkan SM5 and hardware ray tracing, either ray queries or the full ray-tracing pipeline. Both modes are supported, although they differ slightly in behavior and performance.
To enable MegaLights on mobile, open Engine\Source\Runtime\Renderer\Private\MegaLights\MegaLights.cpp in Visual Studio and change the following code:
 }

            // SM6 because it uses typed loads to accumulate lights

-           return IsFeatureLevelSupported(ShaderPlatform, ERHIFeatureLevel::SM6)

+           return (IsFeatureLevelSupported(ShaderPlatform, ERHIFeatureLevel::SM6) || IsVulkanMobileSM5Platform(ShaderPlatform))

                    && RHISupportsWaveOperations(ShaderPlatform)

                    && RHISupportsRayTracing(ShaderPlatform);

        }
The comment in the Unreal source code states that SM6 is required only because the implementation uses typed loads to accumulate light data. Typed UAV loads are relatively new on the DirectX side, but have long been available in Vulkan, which is why it is safe to extend the check to Vulkan Mobile SM5 platforms.
After you make this change, rebuild the editor, create a test project, enable MegaLights in the Project Settings, and perform an initial test run on an Android device.
Troubleshooting
Depending on the UE version source that you pulled from Epic’s GitHub repository, you may encounter Android-specific build issues. Mobile SM5 support in the engine is still experimental, and MegaLights itself is in a beta stage at the time of writing.
Shader variant Limit
When working with the shader compiler, we encountered a warning from the shader compiler about exceeding the maximum number of shader permutations for global shaders.
MegaLights internally generates many permutations from a relatively small number of shaders. A straightforward workaround is to increase the global permutation limit in Engine/Source/Runtime/Engine/Private/ShaderCompiler/ShaderCompiler.cpp:
                        }

                }

-               int32 PermutationCountLimit = 832;      // Nanite culling as of today (2022-01-11) can go up to 832 permutations

  +               int32 PermutationCountLimit = 1024;     // MegaLights on mobile

                  if (Substrate::IsSubstrateEnabled())

                {

                        PermutationCountLimit = 1368;   // FDeferredLightPS as of 2025-08-08
These values are illustrative and may need to be revisited in future engine versions as more features and shader permutations are added.
Numerical overflows
When building the engine from source, you may run into compilation errors in certain shaders, such as HairStrandsVisibilityUtils.ush, due to constant expressions overflowing the valid range of 16-bit floating-point type on mobile:
F:\UnrealEngine\Engine\Shaders\Private\HairStrands\HairStrandsVisibilityUtils.ush(19,27): Shader FShadeLightSamplesCS, Permutation 1496, VF None:

      /Engine/Private/HairStrands/HairStrandsVisibilityUtils.ush:19:27: error: overflow in the expression when converting to 'min16float' type [-Werror,-Wconst-expr-overflow]

        Out.IndirectIrradiance = 1000000;
In this case, the error is caused by the mobile compiler being stricter about the valid numeric range for 16-bit values. The fix is to clamp the constant to the maximum finite half-precision value:
          Out.Depth = ConvertFromDeviceZ(In.Depth);

        Out.GBufferAO = 1;

        Out.CustomData = float4(InDualScatteringRoughnessOverride, 0, In.Backlit, 0);

-       Out.IndirectIrradiance = 1000000;

+       Out.IndirectIrradiance = 65504;

        Out.DiffuseColor = In.BaseColor;

          Out.SpecularColor = DielectricSpecularToF0(In.Specular);

          Out.PrecomputedShadowFactors = 1;
This change preserves the intent of the original code while staying within the representable range of 16-bit floating-point type on mobile compilers.
Console variables
MegaLights reuses the clustered light grid infrastructure from the Unreal Engine forward renderer, and extends it to support an arbitrary number of lights per cell. As a result, MegaLights requires a global linked list to manage lights efficiently, rather than relying on the fixed-size per-cell light lists used in the default implementation which are limited to eight lights per cell on Android.
If the per-cell limit is used instead, light subsets will vary between frames, resulting in visible flickering artifacts as different lights are alternately included or excluded from the same cell.
When LightLinkedListCulling is enabled, Unreal uses the variable r.Forward.MaxCulledLightsPerCell to compute a global maximum rather than enforcing a strict per-cell limit. This behavior is essential for MegaLights to function correctly on mobile platforms.
To ensure proper operation, add the following console variables to your project’s configuration file:
  +CVars=r.Forward.LightLinkedListCulling=1

+CVars=r.Forward.MaxCulledLightsPerCell=32
These settings enable linked-list-based light culling and increase the global maximum number of culled lights, preventing unstable lighting artifacts and ensuring consistent behavior across frames.

Visible flickering artifacts may appear when r.Forward.MaxCulledLightsPerCell is not configured properly.
Performance analysis
Two of the most expensive operations in MegaLights are light sampling and light-importance evaluation.
Light sampling
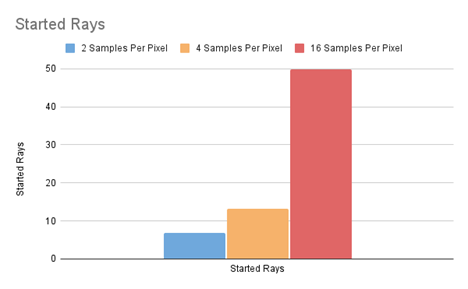
Light sampling determines the visibility of selected lights by casting visibility rays. Depending on the configuration, MegaLights casts N visibility rays per pixel, where N is controlled by the r.MegaLights.NumSamplesPerPixel console variable. The available options today are 2, 4, and 16 samples per pixel.
Ray tracing remains one of the most expensive stages in MegaLights. Increasing the number of samples per pixel directly increases the number of visibility rays, resulting in significantly higher per-frame workload. MegaLights samples only N lights per frame, so raising N can reduce noise and improve responsiveness to rapid changes in lighting importance. However, it also increases GPU cost significantly so this setting should be used with caution.
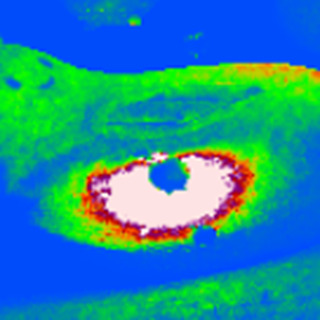
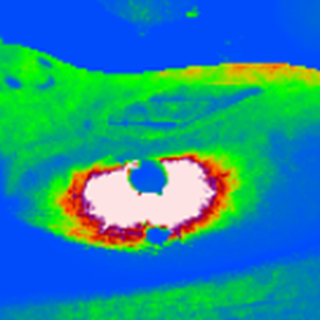
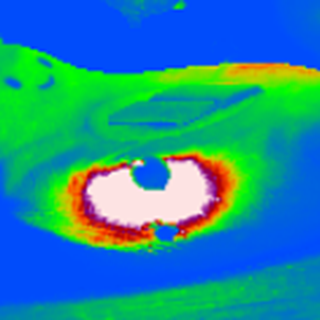
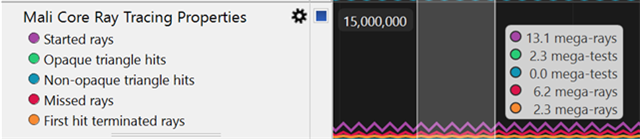
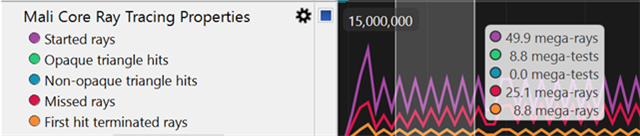
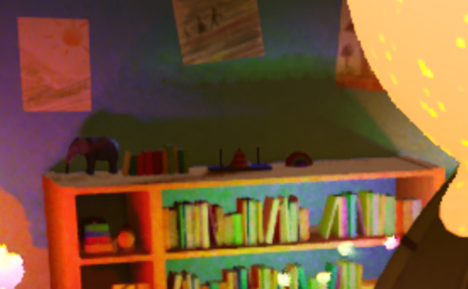
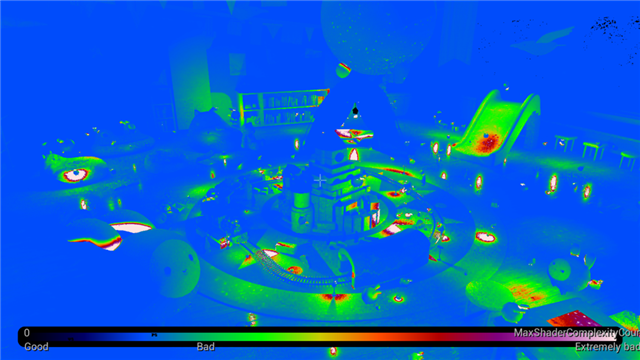
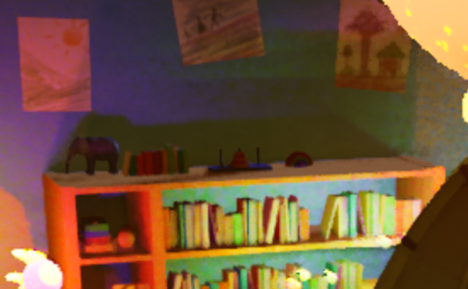
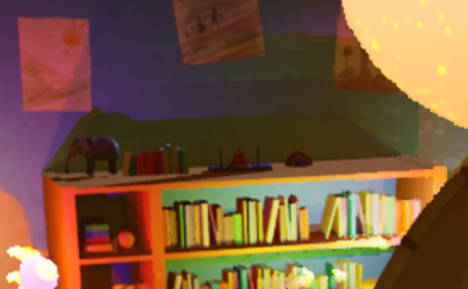
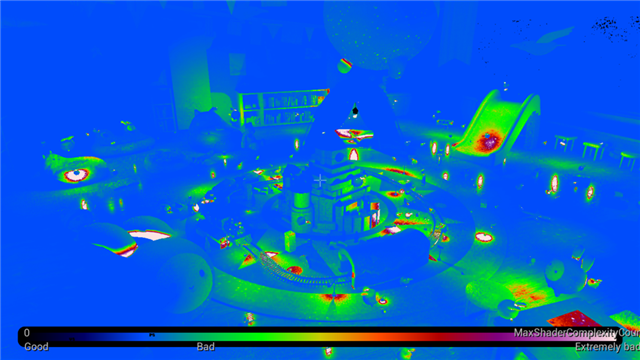
We captured several images using different numbers of samples per pixel for comparison. The zoomed-in rendering results show clear differences in shadow noise with higher sample counts producing noticeably cleaner images. The zoomed light-complexity view also highlights the differences in noise.
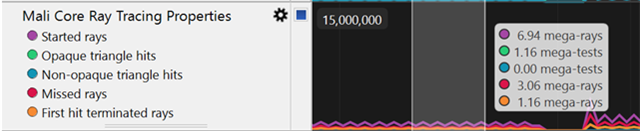
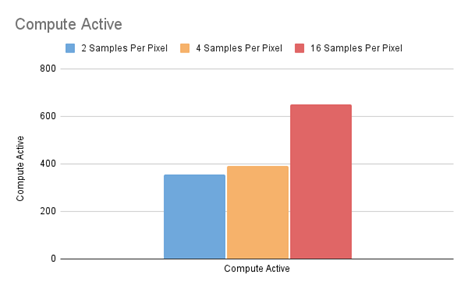
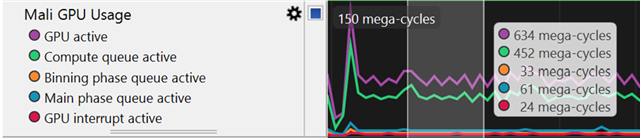
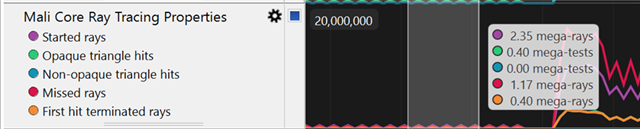
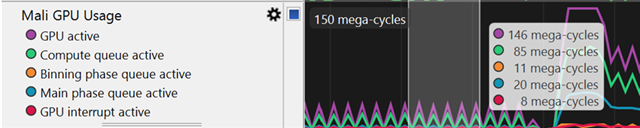
We used Arm Performance Studio to capture the Started Rays and Compute Active counters. To ensure consistent measurement across configurations, we capped the demo at 15 FPS so that all runs would execute at the same frame rate. We then captured the counters to analyze the actual GPU workload. The data shows that the number of started rays increases linearly with the number of samples per pixel. The compute workload remains similar for the 2-sample and 4-sample configurations however, the workload rises significantly when using 16 samples per pixel.
| Num samples per pixel = 2 | Num samples per pixel = 4 | Num samples per pixel = 16 |
 |
 |
 |
 |
 |
 |
 |
 |
 |
 |
 |
 |
|
Started Rays = 6.94 M |
Started Rays = 13.1 M |
Started Rays = 49.9 M |
|
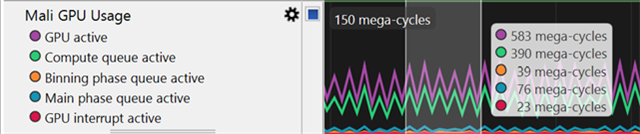
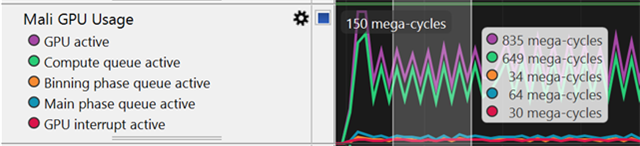
Compute Active = 355 M |
Compute Active = 390 M |
Compute Active = 649 M |

 |
 |
Light-importance evaluation
MegaLights is an importance-driven sampling system, so light importance must be evaluated every frame. Instead of evaluating every light in the scene for every pixel, MegaLights divides the screen into 8×8 tiles and stores per-tile light-importance data in a light-importance buffer. Each tile maintains a local light list that contains only the lights that influence it. MegaLights evaluates the importance of each light in the tile every frame and shares the resulting importance data across all pixels within that tile. When a scene contains many overlapping lights, the per-tile light list becomes longer, which increases the cost of importance evaluation.
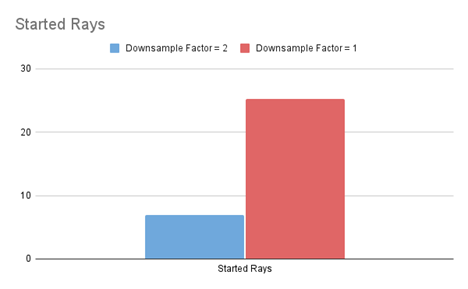
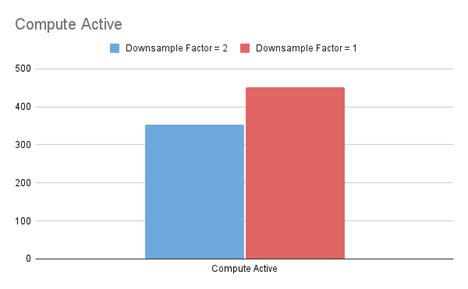
The light-importance buffer can use a different resolution from the scene-color buffer. A lower-resolution importance buffer reduces the cost of importance evaluation. The resolution is controlled by r.MegaLights.DownsampleFactor, which currently supports values of 1 and 2. Using a factor of 2 reduces the cost of importance evaluation to roughly one quarter of the factor-1 cost, but at the expense of higher shading noise. The downsample factor also affects the total number of visibility rays. Lowering the factor increases the cost of importance evaluation and the number of visibility rays cast per pixel.
The number of visibility rays cast per frame can be approximated by the following formula:
W = scene-color resolution in X

H = scene-color resolution in Y

N = number of samples per pixel

F = downsample factor

Number of visibility rays per frame = (W × H × N) / (F × F)
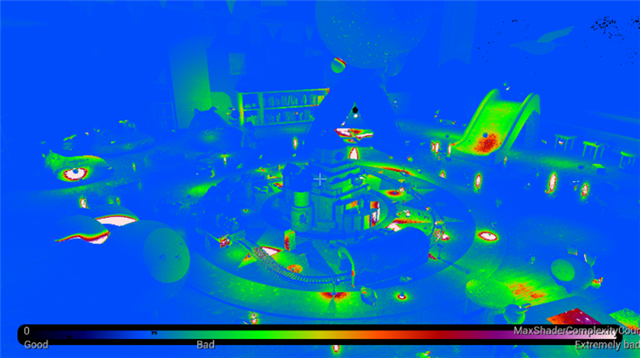
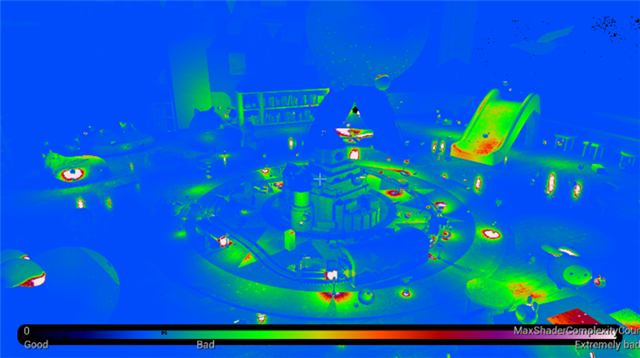
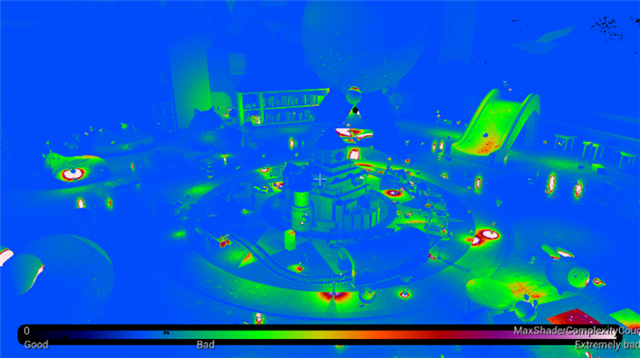
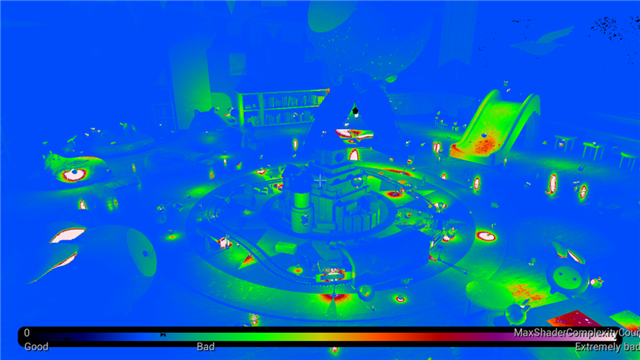
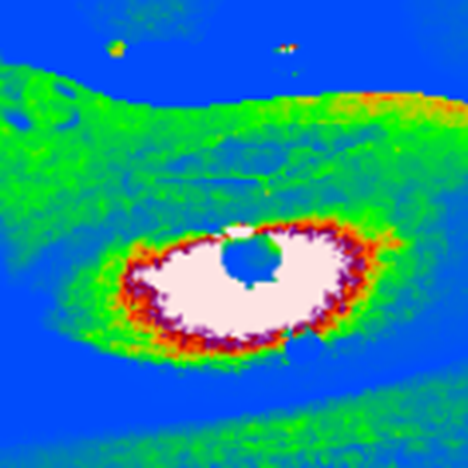
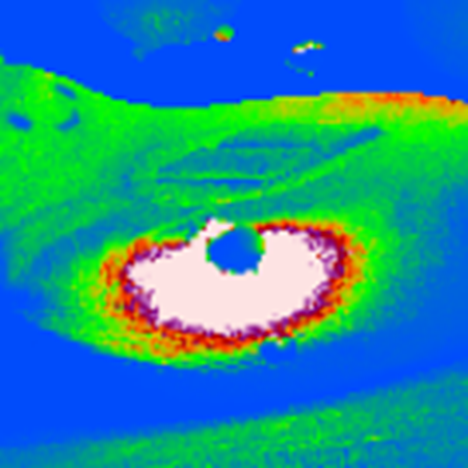
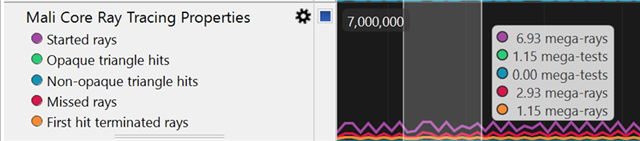
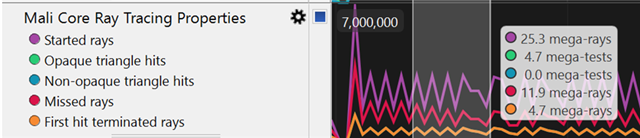
We also captured several images and hardware counters using different downsample factors to further evaluate our formula. The images show that a downsample factor of 2 produces more jittered shadow edges and additional noise in the lighting results. The Light Complexity debug view makes these differences easier to see.
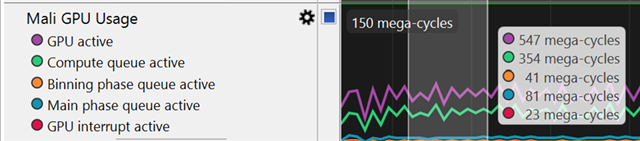
The number of Started Rays for downsample factor 1 is approximately four times that of factor 2, confirming that the total number of visibility rays increases linearly with respect to the downsample factor. On the other hand, the Compute Active counter does not scale linearly with the downsample factor in the same way the number of started rays does.
| Downsample Factor = 2 | Downsample Factor = 1 |
 |
 |
 |
 |
 |
 |
 |
 |
|
Started Rays = 6.93 M |
Started Rays = 25.3 M |
|
Compute Active = 354 M |
Compute Active = 452 M |
 |
 |
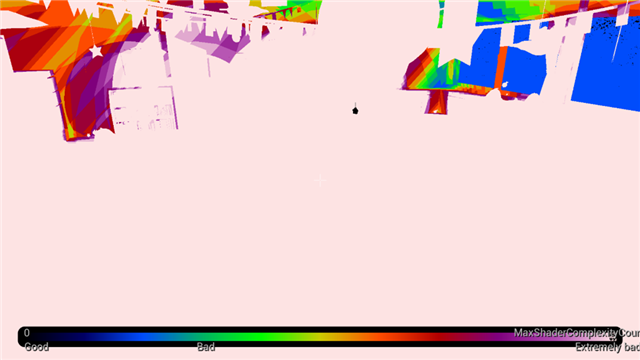
MegaLights-based deferred shading vs traditional deferred shading
We compared the performance between MegaLights-based rendering and traditional deferred shading. The test scene contained around 195 point lights and 1 directional light, all casting shadows. Both pipelines used hardware ray-traced shadows and were tested on a Mali-G1 GPU configured with 12 cores. MegaLights used 2 samples per pixel with a downsample factor of 2. Under these conditions, MegaLights achieved approximately 41 FPS, while deferred shading reached only about 8 FPS.
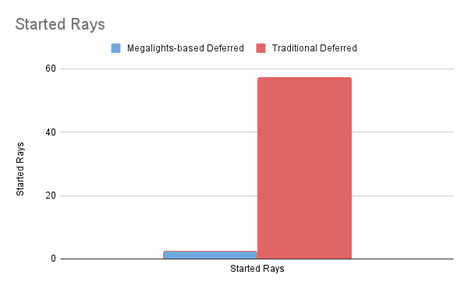
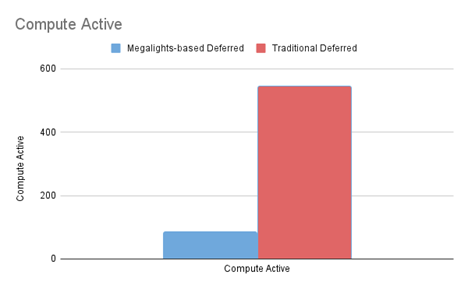
The Light Complexity debug view shows extensive lighting overlap in the traditional deferred shading path, which explains the low frame rate. The hardware counters reinforce this observation: the Started Rays counter for traditional deferred shading is nearly 24× higher than for MegaLights, and the Compute Active counter is almost 6× higher. For hardware-counter analysis, we capped both paths at 5 FPS to ensure consistent frame time. All Started Rays and Compute Active results below are measured under this fixed-FPS configuration.
The final lighting results show thatthe MegaLights-based output is slightly noisier than the traditional result, but the overall quality remains reasonably close. Given the large difference in GPU cost, MegaLights achieves a well-balanced tradeoff between performance and visual quality on mobile device.
| Megalights-based Deferred Shading - 41 FPS | Traditional Deferred Shading - 8 FPS |
 |
 |
 |
 |
 |
 |
|
Started Rays = 2.35 M |
Started Rays = 57.0 M |
|
Compute Active = 85 M |
Compute Active = 544 M |
 |
 |


Best practices for artists
How to enable MegaLights for project
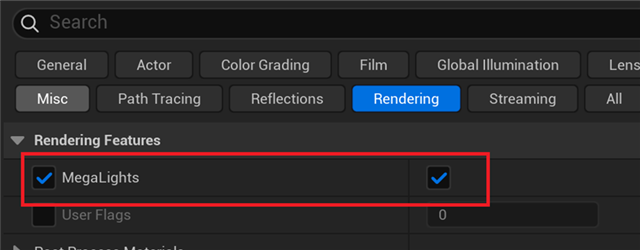
To enable MegaLights, first enable the MegaLights option in the Project Settings. This activates MegaLights support for the entire project.
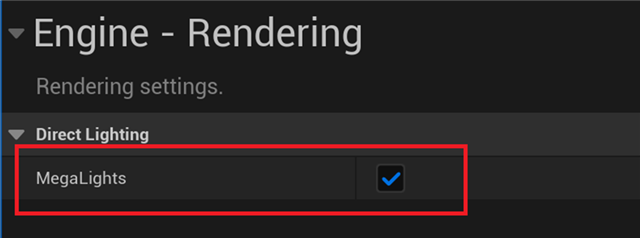
In the Post-Processing settings, you can control MegaLights at runtime using the MegaLights toggle to switch the feature on or off on the fly.
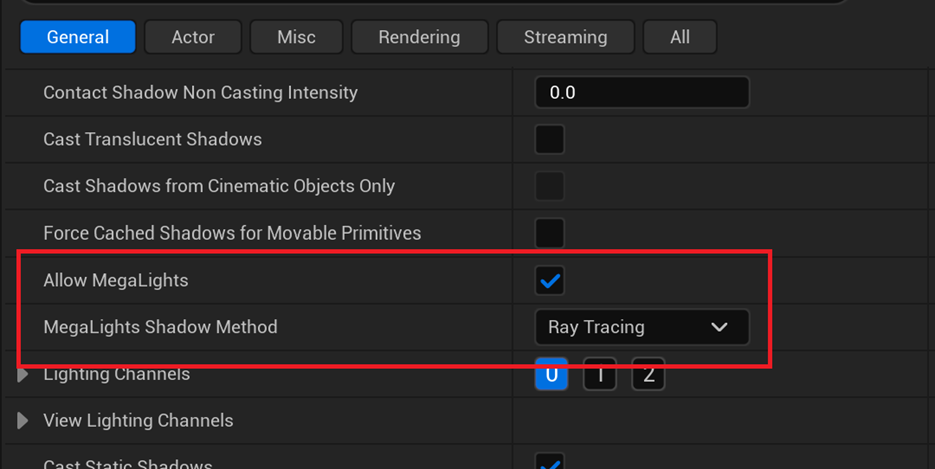
Additionally, each light actor in the scene can independently enable or disable MegaLights. Each light also provides a MegaLights Shadow Method option, allowing you to choose between Ray Tracing and Virtual Shadow Maps for that light. For MegaLights, ray-traced shadows are generally recommended.
Directional light strategy
The MegaLights checkbox appears in the Directional Light settings, the system does not support directional lights by default. This behavior is intentional.
A Directional Light usually acts as the primary global light source, such as the Sun, and affects every pixel. For this reason, relying on MegaLights stochastic sampling can be problematic. If MegaLights does not select the directional light as a primary light for a frame or tile, the scene can lose illumination or exhibit visible flicker.
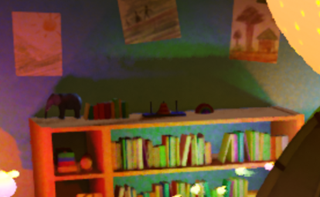
For maximum stability and visual quality, keep MegaLights disabled for your main Directional Light. Instead, continue using standard Cascaded Shadow Maps (CSM) or dedicated Ray Traced Shadows. One of MegaLights key strengths is its ability to compose seamlessly with traditional shadowing techniques. The image below demonstrates this hybrid approach. The Directional Light uses standard shadow maps for stable global shadows, while the hundreds of local point lights are handled efficiently by MegaLights.

If you have a specific use case such as a secondary distant light and wish to force-enable MegaLights for directional lights, you must explicitly add the following console variables to your configuration:
  +CVars=r.Forward.LightBuffer.Mode=1

+CVars=r.MegaLights.DirectionalLights=1
For example, if you have multiple directional lights in your scene, you can use these console variables to enable global support, but then manually disable the MegaLights option on your main light source. This allows secondary directional lights to run efficiently via MegaLights, while keeping your primary light stable using traditional shadowing.
Masked material
When MegaLights casts a visibility ray, it only performs ray–triangle intersection tests for performance reasons and, by default, does not evaluate the hit material. As a result, masked materials are treated as opaque during visibility testing. If your scene relies on masked materials for correct shadowing or visibility, you need to enable material evaluation so that MegaLights can read the final opacity at the hit point:
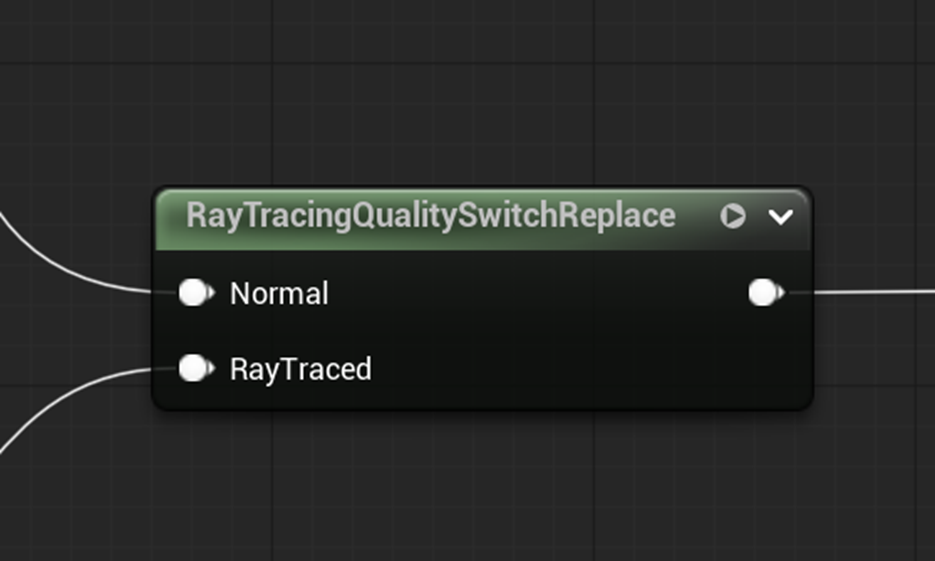
+CVars=r.MegaLights.HardwareRayTracing.EvaluateMaterialMode=1However, evaluating materials during visibility rays can be very expensive, especially for complex materials. If a material is costly to evaluate, developers can use the RayTracingQualitySwitchReplace node to switch between the normal rendering material path and a simplified version used only for ray tracing. This allows you to create a lightweight material specifically for visibility-ray evaluation. For example, you can bypass most material attributes and output only the correct mask value. This can reduce the cost of material evaluation during ray tracing.
By default, MegaLights uses ray queries for visibility testing, as they tend to offer better performance than the full ray-tracing pipeline when only hit information is required and no material data needs to be evaluated. When material evaluation is enabled, MegaLights switches to the full hardware ray-tracing pipeline to evaluate the material at the hit point and apply its opacity correctly.
As a result, accurate shadowing for masked materials requires devices that support the full hardware ray-tracing pipeline. On devices that only support ray queries, and not the full ray-tracing pipeline, masked materials will still be treated as opaque in MegaLights visibility tests, even if material evaluation is requested.
To improve performance and maintain consistent behavior across different classes of mobile GPUs, we strongly recommend minimizing or avoiding masked materials in scenes that make heavy use of MegaLights.
Screen trace
MegaLights also uses screen tracing, similar to Lumen. When MegaLights casts a visibility ray, it first performs a screen trace for a certain distance before switching to the hardware raytracing beyond that range. Screen tracing relies solely on depth information to determine intersections, it does not account for actor properties. For example, an actor with Cast Shadows disabled can still appear to cast a shadow if it falls within the screen-trace distance range, as illustrated in the image below.
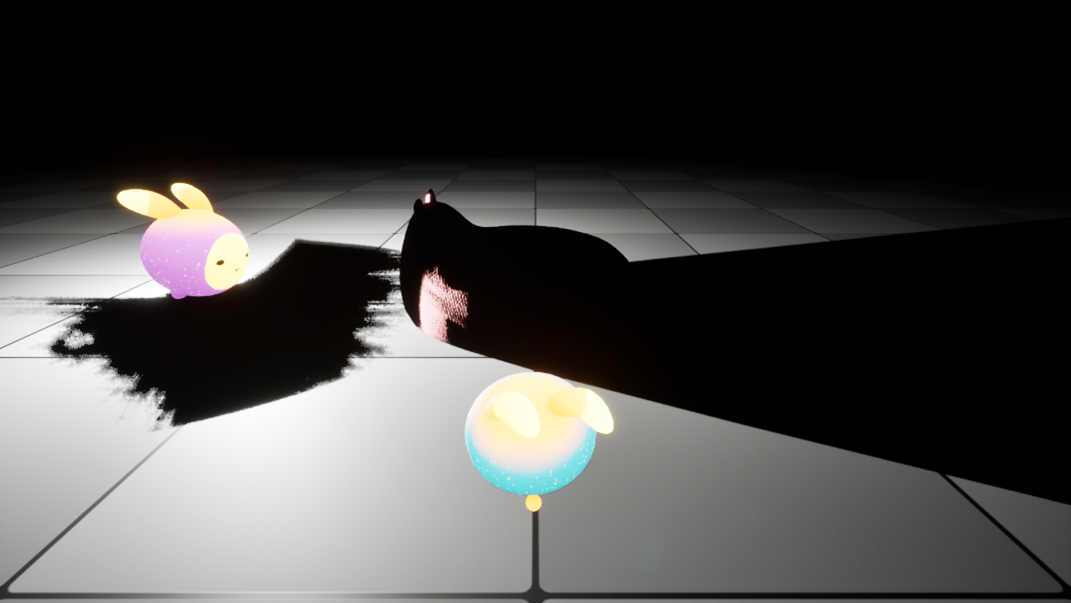
In this example, a point light is attached to the center of the fairy mesh, and the mesh is configured not to cast shadows. However, when screen tracing enabled, the fairy mesh still appears to cast a shadow. This occurs because screen tracing relies solely on depth information and does not account for per-actor shadow-casting settings. To avoid this issue, disable screen tracing using the following console variable:
+CVars=r.MegaLights.ScreenTraces=0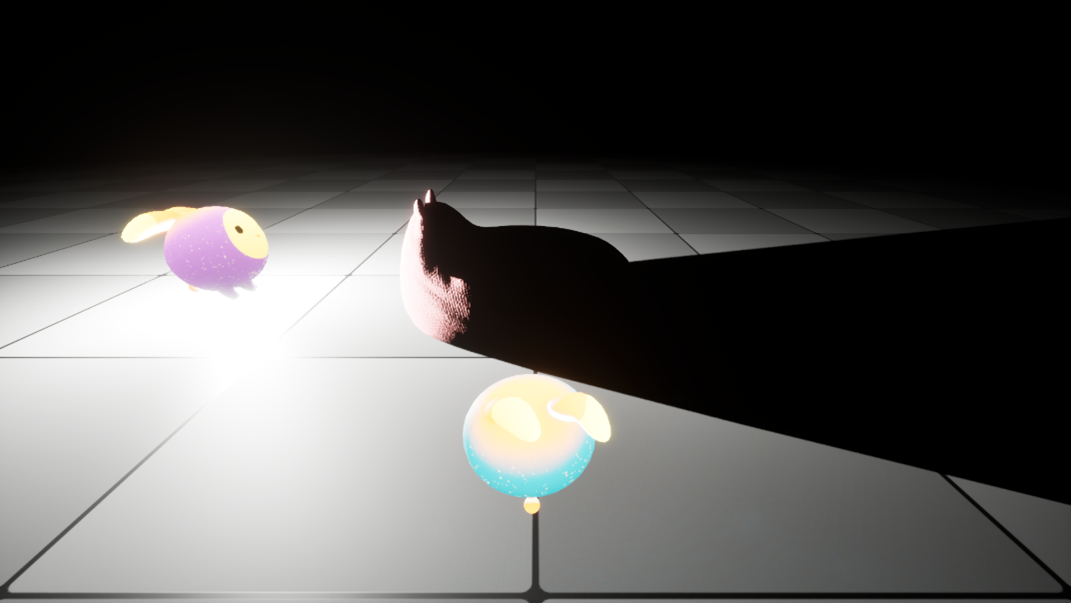
Two additional console variables control screen-trace behavior and can help address the shadowing issue described earlier. The primary purpose of screen tracing is to compensate for differences between the rendered mesh and the ray-tracing mesh, such as with Nanite geometry. However, when hardware ray tracing is enabled and the mesh is not a Nanite mesh, UE uses the original mesh geometry to build the ray-tracing acceleration structure. As a result, there is no discrepancy between rasterized and ray-traced geometry. In this case, you can usually disable screen tracing entirely.
| r.MegaLights.ScreenTraces.MaxDistance | Max distance in world space for screen space tracing. |
|
r.MegaLights.ScreenTraces.RelativeDepthThickness |
Determines depth thickness of objects hit by HZB tracing, as a relative depth threshold. |
Distance fields
MegaLights uses hardware ray tracing exclusively for shadowing so review your rendering pipeline and disable distance fields unless they are required by other rendering features.
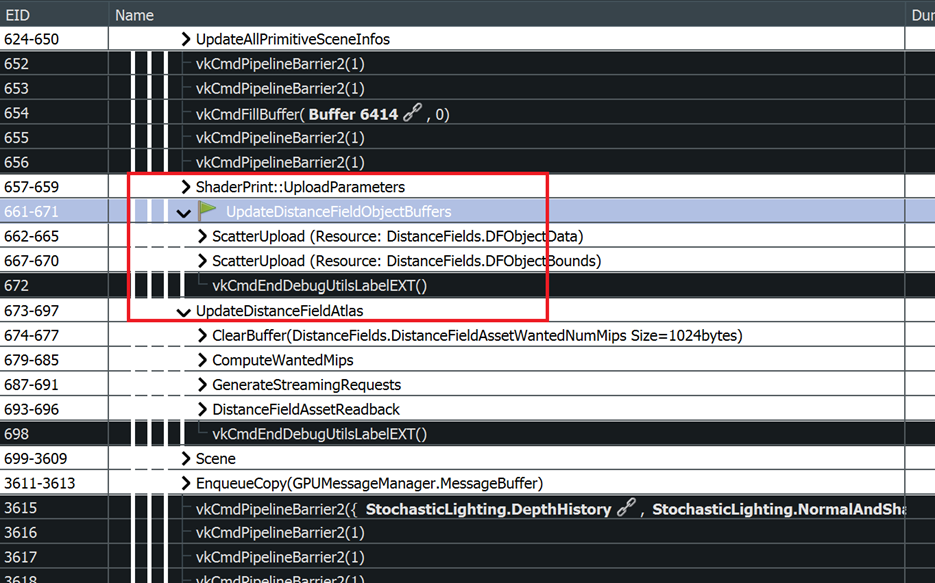
Both hardware ray tracing and distance fields introduce significant upfront costs. Hardware ray tracing requires building or updating BVH structures, while distance fields require updating voxelized representations of the scene. If your project uses both hardware ray-tracing-based effects and SDF-based effects, the engine must update both the BVH and the distance field voxel data at the beginning of each frame, resulting in unnecessary overhead.
If your project relies purely on Hardware Ray Tracing, uncheck the “Generate Mesh Distance Fields” option in the project settings to prevent unnecessary per-frame distance field updates.

Debug view
The MegaLights debug view is a useful tool because it provides a variety of information that can help diagnose and optimize performance. Use the following console variable to enable the debug view:
r.MegaLights.Debug = 1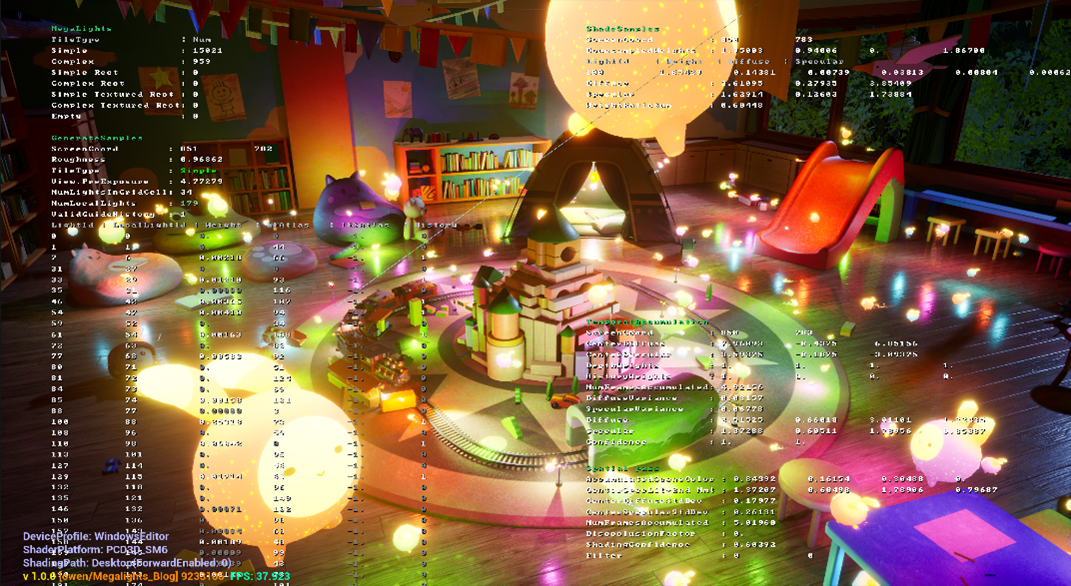
MegaLights uses two types of tiles: simple and complex. As the names suggest, complex tiles are more expensive to process than simple tiles, so monitor how many complex tiles are present in a scene. When the number of complex tiles becomes high, the overall lighting cost will increase accordingly.
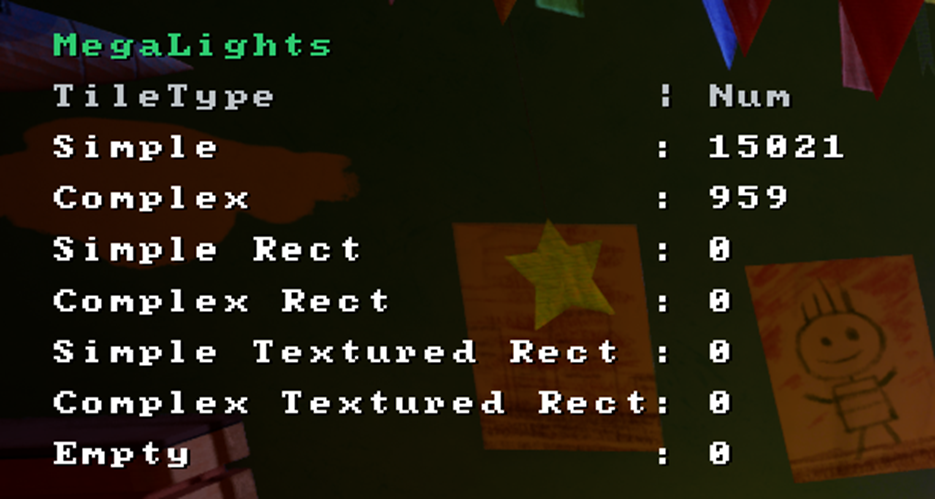
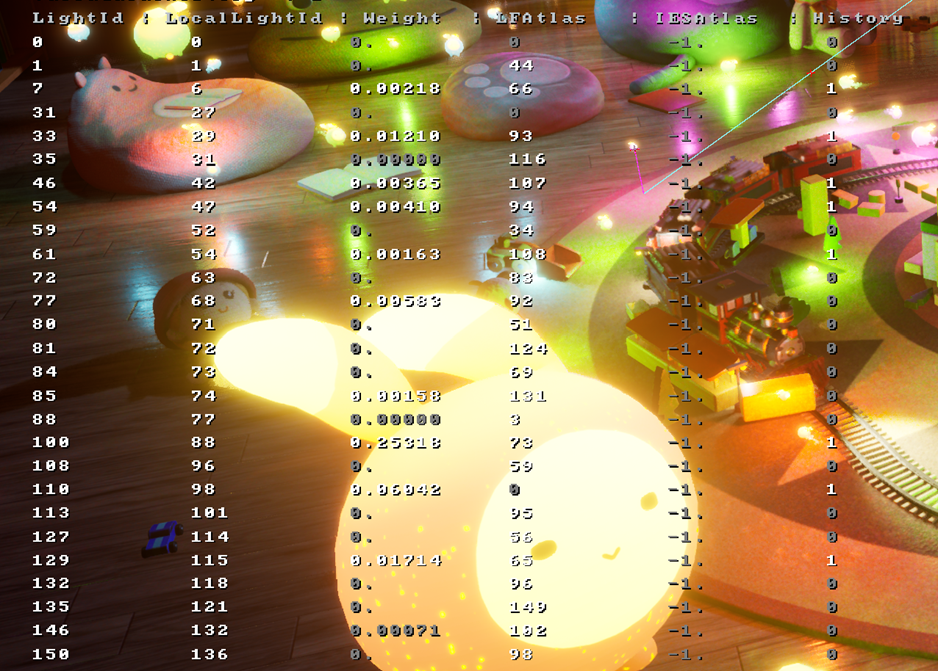
In the debug view, you can use the mouse cursor to select a pixel and inspect its associated information. Several lines will be drawn from the pixel to the sampled light sources, indicating which lights were selected for that pixel. The NumLightsInGridCell value is particularly useful for identifying whether too many lights overlap in that region. The TileType field shows whether the selected pixel belongs to a simple or complex tile.
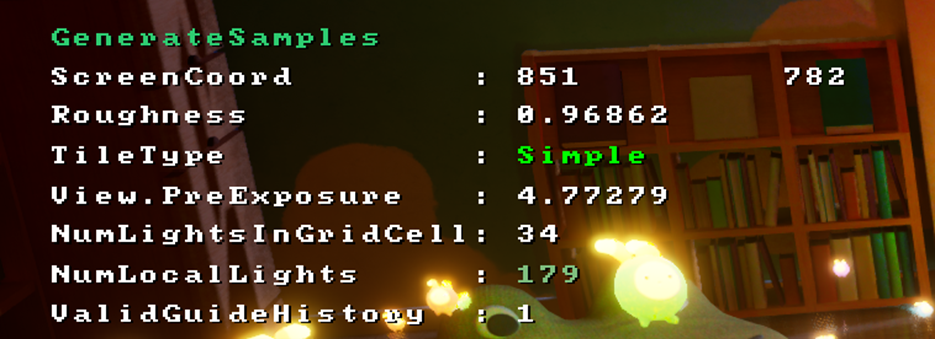
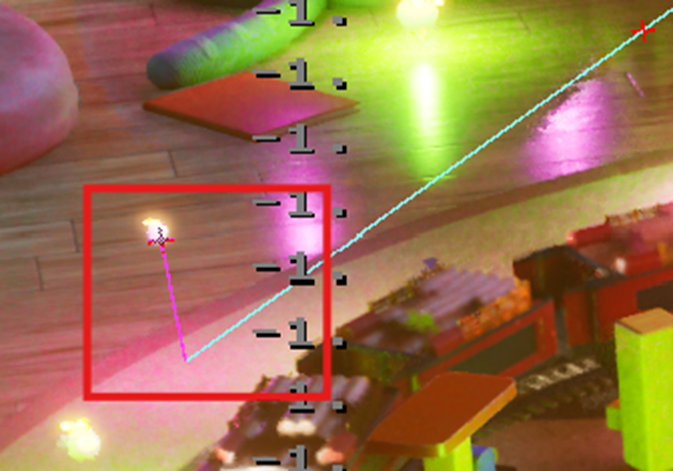
The debug view also provides a list of light-weight values that indicate the importance of each light to the selected pixel. When a light actor is selected, its corresponding LightId is highlighted in red, allowing you to quickly identify the light you are interested in.
Conclusion
MegaLights demonstrates an efficient approach to many-light rendering on mobile GPUs such as Mali-G1. By sampling only a small number of important lights per pixel, MegaLights reduces per-frame lighting cost while still maintaining visual quality. In our tests with more than 190 dynamic, shadow-casting lights, MegaLights achieved performance 5 x the performance of traditional deferred shading while preserving comparable lighting quality.
These results highlight MegaLights as a practical and scalable lighting solution for power- and bandwidth-constrained devices. It provides a balance between real-time performance and visual quality on modern mobile ray-tracing hardware.
See MegaLights on mobile in action at SIGGRAPH 2026. Join Arm Create SIGGRAPH, an Arm-hosted developer day on July 20, to see how MegaLights and Arm Neural Technology come together in Neural Dawn, a production quality mobile game from Arm and Sumo Digital.
References

By Owen Wu
Re-use is only permitted for informational and non-commercial or personal use only.
