Azure Kubernetes Service on Arm-based Ampere Altra processors
In this blog, we walk through a sample deployment of WordPress (with MySQL) on Azure Kubernetes Service (AKS). We will deploy the cluster on Arm-based Ampere Altra VMs which recently became generally available.
By Julio Suarez

In this blog, we walk through a sample deployment of WordPress (with MySQL) on Azure Kubernetes Service (AKS). We deploy the cluster on Arm-based Ampere Altra VMs which recently became generally available.
Prerequisites
This blog assumes the reader has a basic working knowledge of public clouds and kubernetes.
The following tools should be installed on the machine that deploys and manages the cluster:
- An installation of Terraform. See the Terraform installation instructions for more.
- Terraform is used to automate the creation of the AKS cluster.
- An installation of
kubectl. See thekubectlinstallation instructions for more information.kubectlis used to interact with the AKS cluster and deploy WordPress.
- An installation of the Azure CLI. See the Azure CLI installation instructions for more information.
- Azure CLI is used by Terraform for deployment authentication and for downloading the credentials needed to interact with the cluster via
kubectl.
- Azure CLI is used by Terraform for deployment authentication and for downloading the credentials needed to interact with the cluster via
Useful Documents
Before exploring the deployment configuration, we encourage readers to review the AKS documentation, Azure Developer documentation, Kubernetes documentation, and the Terraform Azure Providers documentation. We found these resources to be very useful.
AKS Cluster Deployment Configuration
The Terraform configuration files we show below are a modified version of the AKS Terraform quick start instructions.
For this AKS deployment, the Terraform configuration is broken into four files: providers.tf, variables.tf, main.tf, and outputs.tf. We explain only some of the configurations in these files and leave the rest for the reader to explore through the documentation linked above.
Let us start with providers.tf which is shown below.
terraform {
  required_version = ">=1.0"

  required_providers {
    azurerm = {
      source  = "hashicorp/azurerm"
      version = "~>3.0"
    }
    random = {
      source  = "hashicorp/random"
      version = "~>3.0"
    }
  }
}

provider "azurerm" {
  features {}
}
This file does two things. It tells Terraform which cloud provider to use (Azure), and sources the random module. The random module is used later to generate a random name for the Azure resource group. The next file is variables.tf.
variable "agent_count" {
  default = 3
}

variable "cluster_name" {
  default = "arm-aks-cluster-demo"
}

variable "dns_prefix" {
  default = "arm-aks"
}

variable "resource_group_location" {
  default     = "eastus"
  description = "Location of the resource group."
}

variable "resource_group_name_prefix" {
  default     = "arm-aks-demo-rg"
  description = "Prefix of the resource group name that's combined with a random ID so name is unique in your Azure subscription."
}

variable "ssh_public_key" {
  default = "~/.ssh/id_rsa.pub"
}
This file allows us to adjust various parameters. Including how many nodes to deploy and the name of the cluster.
The next file is outputs.tf.
output "resource_group_name" {
  value = azurerm_resource_group.rg.name
}
This file sets up a Terraform output. Here we output the name of the resource group that is created.
Last, we have main.tf. This file defines the cluster configuration.
# Generate random resource group name
resource "random_pet" "rg_name" {
  prefix = var.resource_group_name_prefix
}

resource "azurerm_resource_group" "rg" {
  location = var.resource_group_location
  name     = random_pet.rg_name.id
}

resource "azurerm_kubernetes_cluster" "k8s" {
  location            = azurerm_resource_group.rg.location
  name                = var.cluster_name
  resource_group_name = azurerm_resource_group.rg.name
  dns_prefix          = var.dns_prefix
  tags                = {
    Environment = "Demo"
  }

  default_node_pool {
    name       = "demopool"
    vm_size    = "Standard_D2ps_v5"
    node_count = var.agent_count
  }
  linux_profile {
    admin_username = "ubuntu"

    ssh_key {
      key_data = file(var.ssh_public_key)
    }
  }
  identity {
    type = "SystemAssigned"
  }
}
The first two blocks generate a random name and assign that name to the resource group. The last block shows a resource of type azurerm_kubernetes_cluster. This block is an important part of the configuration because it defines the cluster that is deployed. Here we set a location for the cluster and the resource group this cluster belongs to (notice the location is the same as the location of the resource group). We also set the name of the cluster and the DNS name prefix using variabless (var.cluster_name & var.dns_prefix). The block labeled default_node_pool is where we select the VM (vm_size) and number of nodes (node_count) for the cluster. vm_size is how we set the cluster to be deployed with Altra Arm-based VMs. Here we select Standard_D2ps_v5 which is a 2 vCPU Altra-based VM with standard SSDs.
There are various Arm-based VMs that can be selected. The Azure VM series descriptions show that the Dpsv5, Dpdsv5, Dplsv5, Dpldsv5, Epsv5, Epdsv5 all use Ampere Altra. Using any of these VM types creates an Arm-based cluster.
Deploying & Connecting to the Cluster
Before deploying with Terraform, we must log into Azure using the Azure CLI. Depending on how your subscription and users are configured, you may need to include a user name, a service principal, or a tenant when logging in. In this case, we have a single sign on setup, so we need to run the following command.
az loginAfter signing in, we can deploy the cluster with Terraform. Run the following command in the directory that contains the Terraform files.
terraform applyIt took about 5 minutes for this command to complete. Once it completes, it will output the name of the resource group (arm-aks-demo-rg-possible-goldfish).

The resource group name should appear in the Azure portal under Resource groups. The cluster (arm-aks-cluster-demo) can also be found under Kubernetes services in the portal. The next step is download the cluster credentials so that we can use the kubectl command. Within the Kubernetes services console, select the cluster and click on connect. Clicking connect brings up instructions that list two commands. An az account set command, and an az aks get-credentials command. Once these two commands are executed, we will be able to use kubectl.
Before we deploy WordPress, use kubectl to check the cluster.
Run the following command to see the status of the nodes. They should be in the ready state.
kubectl get nodes
Run the following command to see the current pods running on the cluster.
kubectl get pods -A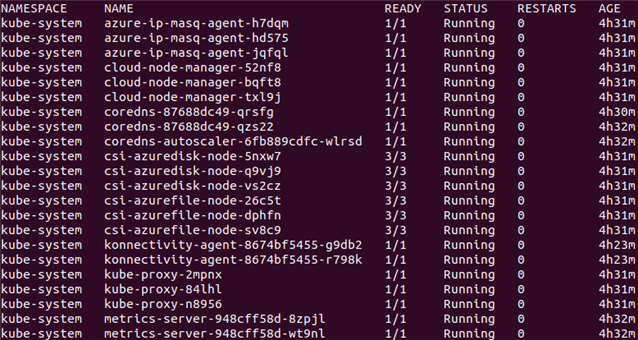
These services are various support pods that help maintain the cluster. Make sure that all of these services are in a running state as shown above. Last, take note of the kube-proxy pods, there is one kube-proxy pod on each node. We explain kube-proxy later.
Now that we see the cluster is in good shape, let us move on to deploying WordPress.
Understanding WordPress Deployment Files
The Kubernetes yamls we show below are a modified version of the Kubernetes WordPress Tutorial in the Kubernetes documentation. We found that running this tutorial as-is does not work. Therefore, we suggest using our modified version of these yamls.
We use three yaml files to deploy WordPress: kustomization.yaml, mysql-deployment.yaml, and wordpress-deployment.yaml. We will only explain some of the configurations in these files and leave the rest for the reader to explore through the documentation linked above.
Let us start with kustomization.yaml.
secretGenerator:
  literals:
  - password=YourPasswordHere
resources:
  - mysql-deployment.yaml
  - wordpress-deployment.yaml
This file allows us to set passwords for the MySQL database. The resources section selects which files these kustomizations apply to. Information on working with kustomizations is in the Kubernetes documentation
The next file is mysql-deployment.yaml.
apiVersion: v1
kind: Service
metadata:
  name: wordpress-mysql
  labels:
    app: wordpress
spec:
  ports:
    - port: 3306
  selector:
    app: wordpress
    tier: mysql
  clusterIP: None
---
apiVersion: v1
kind: PersistentVolumeClaim
metadata:
  name: mysql-pv-claim
  labels:
    app: wordpress
spec:
  accessModes:
    - ReadWriteOnce
  storageClassName: managed-csi
  resources:
    requests:
      storage: 20Gi
---
apiVersion: apps/v1
kind: Deployment
metadata:
  name: wordpress-mysql
  labels:
    app: wordpress
spec:
  selector:
    matchLabels:
      app: wordpress
      tier: mysql
  strategy:
    type: Recreate
  template:
    metadata:
      labels:
        app: wordpress
        tier: mysql
    spec:
      containers:
      - image: mysql:8.0.30
        name: mysql
        env:
        - name: MYSQL_DATABASE
          value: wordpressdb
        - name: MYSQL_ROOT_PASSWORD
          valueFrom:
            secretKeyRef:
              name: mysql-pass
              key: password
        - name: MYSQL_USER
          value: mysqluser
        - name: MYSQL_PASSWORD
          valueFrom:
            secretKeyRef:
              name: mysql-pass
              key: password
        ports:
        - containerPort: 3306
          name: mysql
        volumeMounts:
        - name: mysql-persistent-storage
          mountPath: /var/lib/mysql
      volumes:
      - name: mysql-persistent-storage
        persistentVolumeClaim:
          claimName: mysql-pv-claim
This file will deploy a pod with a MySQL container. There are three objects defined. The first object (line 2) is a Service object. This will create a service called wordpress-mysql. This service will be assigned to be the front end to the MySQL pod through the use of a selector (lines 10-12). Therefore, whenever a pod within the cluster wants to communicate with the MySQL pod, it will communicate using the wordpress-mysql service name. By default, kube-proxy is what manages service communications. When a service has multiple backend pods, kube-proxy can load balance across those backend pods. However, in this case, we only have a single MySQL pod. So we do not need kube-proxy to handle the service. We can effectively bypass kube-proxy by running this service in headless mode. We enable headless mode by adding clusterIP: None to the service spec (line 13).
The next object defined (line 16) is a Persistent Volume Claim (PVC). This object is used to mount storage inside the MySQL pod. A key point to understand is that the PVC object is not what creates the storage. It is a declaration of a type of storage that we want available to the cluster. As shown above, we are declaring that we need 20GiB of storage (line 27). We also declare a storage class (line 24) called managed-csi. A storage class is a means to define different types of storage based on storage and performance characteristics. It is possible to create custom storage classes, but cloud providers will also offer various "preset" storage classes to make things easier. The managed-csi class defines a standard SSD (Azure Disk), which is sufficient for this demo. In reality, managed-csi is the default storage class for AKS. Therefore, we could delete it from the yaml, but we declared it explicitly so we can explain how storage is allocated and mounted.
If a PVC does not create storage, how do we create storage? There are two ways to create storage on AKS. We can statically create an Azure disk, or we can have AKS dynamically create an Azure disk. We chose to have AKS dynamically create the disk because it is easier. In short, when a pod is deployed that has a PVC, AKS takes care of allocating the standard SSD to the cluster. And then Kubernetes mounts the storage into the pod that uses the PVC. We will see how a pod can use a PVC in the next section of this yaml file.
The last object created (line 30) is a Deployment. Inside the deployment spec (line 35), we have some selector labels (lines 36-39). Notice that these labels match the labels in the Service object (lines 10-12). This match is what assigns the wordpress-mysql service to the MySQL pod. Within the deployment spec, there is also a pod spec (line 47), where we configure the MySQL container we want deployed in the pod. In the pod spec we, define three things. 1) a MySQL root password (line 54; password taken from kustomization.yaml). 2), a MySQL non-root user (line 59; user name is mysqluser). And, 3) the password for the MySQL non-root user (line 61; password is also taken from kustomization.yaml). Notice that we use the same password for both the root user and the non-root MySQL user. Reusing passwords is bad practice and should not be done in production. In the pod spec we also see a volume claim (line 74) that references the PVC object (line 16). Last, within the pod spec there is a volume mount point (line 71). This mount point is where the dynamically created storage is mounted to within the pod.
The last file is wordpress-deployment.yaml which is shown below.
apiVersion: v1
kind: Service
metadata:
  name: wordpress
  labels:
    app: wordpress
spec:
  ports:
    - port: 80
  selector:
    app: wordpress
    tier: frontend
  type: LoadBalancer
  loadBalancerSourceRanges: ["0.0.0.0/0"]
---
apiVersion: v1
kind: PersistentVolumeClaim
metadata:
  name: wp-pv-claim
  labels:
    app: wordpress
spec:
  accessModes:
    - ReadWriteOnce
  storageClassName: managed-csi
  resources:
    requests:
      storage: 20Gi
---
apiVersion: apps/v1
kind: Deployment
metadata:
  name: wordpress
  labels:
    app: wordpress
spec:
  selector:
    matchLabels:
      app: wordpress
      tier: frontend
  strategy:
    type: Recreate
  template:
    metadata:
      labels:
        app: wordpress
        tier: frontend
    spec:
      containers:
      - image: wordpress:6.0.2-apache
        name: wordpress
        env:
        - name: WORDPRESS_DB_HOST
          value: wordpress-mysql
        - name: WORDPRESS_DB_PASSWORD
          valueFrom:
            secretKeyRef:
              name: mysql-pass
              key: password
        - name: WORDPRESS_DB_NAME
          value: wordpressdb
        - name: WORDPRESS_DB_USER
          value: mysqluser
        ports:
        - containerPort: 80
          name: wordpress
        volumeMounts:
        - name: wordpress-persistent-storage
          mountPath: /var/www/html
      volumes:
      - name: wordpress-persistent-storage
        persistentVolumeClaim:
          claimName: wp-pv-claim
Similar to the MySQL yaml, this file creates three objects. First, there is a Service object (line 2) that is named wordpress (line 4). This service exposes port 80 (line 9) and has its type set to LoadBalancer (line 13). Setting the service type to LoadBalancer will tell Azure to use the Azure Load Balancer which is external to this cluster. The Azure Load Balancer acquires a public IP address and assigns that public IP address to this service. This action exposes this service to the public internet. The AKS Networking documentation has more information on how this process works. Any traffic between the cluster and the public internet will go through this Load Balancer that is external to the cluster. The last item to note in the Service object declaration is the line labeled loadBalancerSourceRanges. This line is a list of public IP addresses that are allowed to connect to this service from the internet. It is set to the open internet (0.0.0.0/0), but this line can be used to restrict which public IPs can connect to this service.
The second object is a PVC (line 17). This is similar to what was explained for the MySQL yaml.
The last object is a Deployment (line 31). In the pod spec (line 48), we set the MySQL user and password to match the MySQL non-root user and password in the MySQL yaml file. This password is how WordPress has permission to read/write to the MySQL database pod. WORDPRESS_DB_HOST (line 53) has been set to the service name of the MySQL pod. This setting is how WordPress is able to find the MySQL pod within the pod network. Last, we have a selector (lines 37-40) that matches with the wordpress Service object. This selector is what assigns the external load balancer to the WordPress pod. Since the load balancer is exposed to the open Internet, the WordPress pod is exposed to the open Internet.
Deploying WordPress
Navigate to the directory that contains kustomization.yaml, mysql-deployment.yaml, and wordpress-deployment.yaml. Enter the following command.
kubectl apply -k ./It takes some time for everything to become ready. Let us first check on the volume claims by running the following command.
kubectl get pvcEventually the volume claims will be bounded to the cluster and appear similar to the image below. Recall, AKS automatically allocates these volumes.

The above does not mean the volumes are attached to the pods. It just means that the volumes have been created and allocated to the cluster.
Next, we can check on the WordPress and MySQL pods by running the following command.
kubectl get podsIt may take a little while for the pods to be created and get into the running state. Eventually the pods should look like the image below.

Now that the pods are running, we can verify that the persistent volumes have been attached by running the following command.
kubectl get volumeattachmentsWe should see the entry for ATTACHED to be set to true as shown below. This setting means the storage is mounted inside the pods at the mount point declared in the pod specs.

To verify WordPress is working, we can connect to WordPress through a browser. To get the external IP address of the WordPress deployment run the following command.
kubectl get svcWe should see an external IP listed like below.

At this point, we can point a browser to the external IP address (in this case, it's 20.42.33.17) and see the WordPress welcome screen.
Conclusion
As shown above, deploying an Arm-based AKS cluster only requires that we set the cluster to deploy Altra-based VMs. We'd like to encourage readers to give AKS with Altra-based VMs a try.

By Julio Suarez
Re-use is only permitted for informational and non-commercial or personal use only.
