High-performance Edge inference with RedisAI
An article on RedisAI inference benchmarking and best practices using TensorFlow & TensorFlow Lite backends running on Jetson Nano devices.
Redis (Remote Dictionary Server) is one of the most popular in-memory key-value databases for distributed high-speed data storage for use cases like data caching, session management, and Pub/Sub. Redis is lightweight (written in C), performant, and reliable so it can be deployed on different platforms and architectures from cloud applications to small IoT devices. The modular structure of Redis allows the implementation of custom operations over stored data. In addition, putting computation close to the data store reduces latency and enhances the performance.
RedisAI is a Redis module created by Redis Labs, designed for running deep learning graphs over stored data. The growing interest in running Machine Learning applications on small devices makes RedisAI an appropriate solution for edge inference. In this blog, we show an implementation of an image classification system that runs machine learning inference over a stream of data on a NVIDIA Jetson Nano device.
Redis on Arm-based Edge devices
NVIDIA Jetson systems (Nano/TX2/Xavier NX/AGX Xavier) are examples of low-power devices equipped with Arm processors with AI computing capabilities for edge applications. Redis runs efficiently on Arm processors, and all versions are tested on the Arm-based Raspberry Pi platform.
The low memory footprint of Redis makes it an ideal candidate for running on small, resource limited (CPU/memory) devices. In addition, data collected by peripheral devices and sensors are received as streams and must be stored in Redis in the right data structure. Redis Streams data type is implemented to satisfy such requirement for data collection and storage, enabling Redis to handle storage and retrieval of streaming data in IoT frameworks efficiently.
Machine Learning Inference with RedisAI
RedisAI modules allows deep learning inference on the data stored in Redis as tensors. In machine learning, tensors are multi-dimensional arrays and are a supported data type in Redis. RedisAI can load and execute machine learning models over tensors using popular machine learning libraries such as TensorFlow, TensorFlow Lite, PyTorch, and ONNX Runtime.
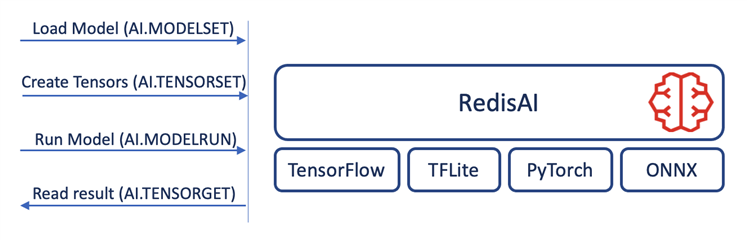
Figure 1: RedisAI backend libraries and inference flow
You can find detailed information on how to use the Redis command line interface to run machine learning inference in the RedisAI documentation.
| TensorFlow vs. TensorFlow Lite models The model format for RedisAI is different for TensorFlow and TensorFlow Lite. While it is possible to feed a TensorFlow model serialized as protocol buffers into RedisAI, TensorFlow Lite models have to be in FlatBuffer format for memory efficiency. Read how to convert a TensorFlow model into FlatbuBuffer in order to load into TensorFlow Lite on TensorFlow website. |
Inference on the Edge: NVIDIA Jetson Nano
Machine learning/deep learning applications use algorithms that can be computed in a highly parallel way (for instance, convolution operation in Convolutional Neural Networks). Since GPUs by their nature process in parallel, they are used extensively in deep learning applications. GPUs noticeably decrease the time required for training and inference.
Backend libraries of RedisAI can manage both CPU and GPU inference. Therefore, users can pick one of them based on the device capability that model is executing on, and their preferences. NVIDIA Jetson Nano systems are a well-suited candidate for IoT applications seeking low price devices with GPU-powered capabilities. Jetson Nano systems come with 128-core Maxwell GPUs and Quad-core ARM Cortex A57, and with the choice of 2GB or 4GB of memory.
To show the inference and resource metrics, we run multiple benchmarks against RedisAI running on a Jetson Nano 4GB using AIBench tool. AIBench runs two different benchmarks against RedisAI: vision benchmark (MobileNetV1), and fraud detection benchmark (Kaggle model). We show the performance of RedisAI Inference on Jetson Nano for both CPU and GPU computations using TensorFlow and TensorFlow Lite backends. Notice that on Jetson Nano, the GPU has no dedicated memory and shares the device memory with the CPU.
Benchmark settings
For the benchmarking, we use a single client with different tensor batch sizes to compare inference rate for TensorFlow and TensorFlow Lite on CPU and GPU. Figure 2 shows the inference/sec for vision benchmark for both TensorFlow and TensorFlow Lite inference, which TensorFlow Lite outperforms TensorFlow for larger batch sizes for both CPU and GPU inferences.
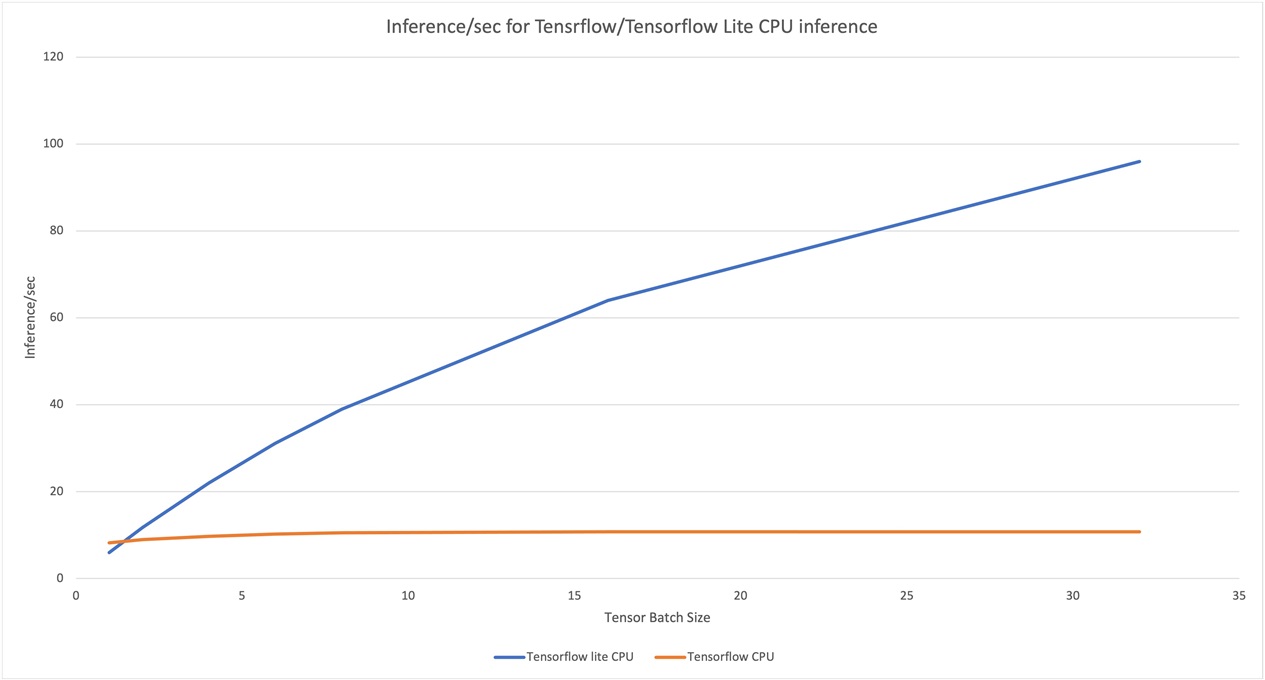
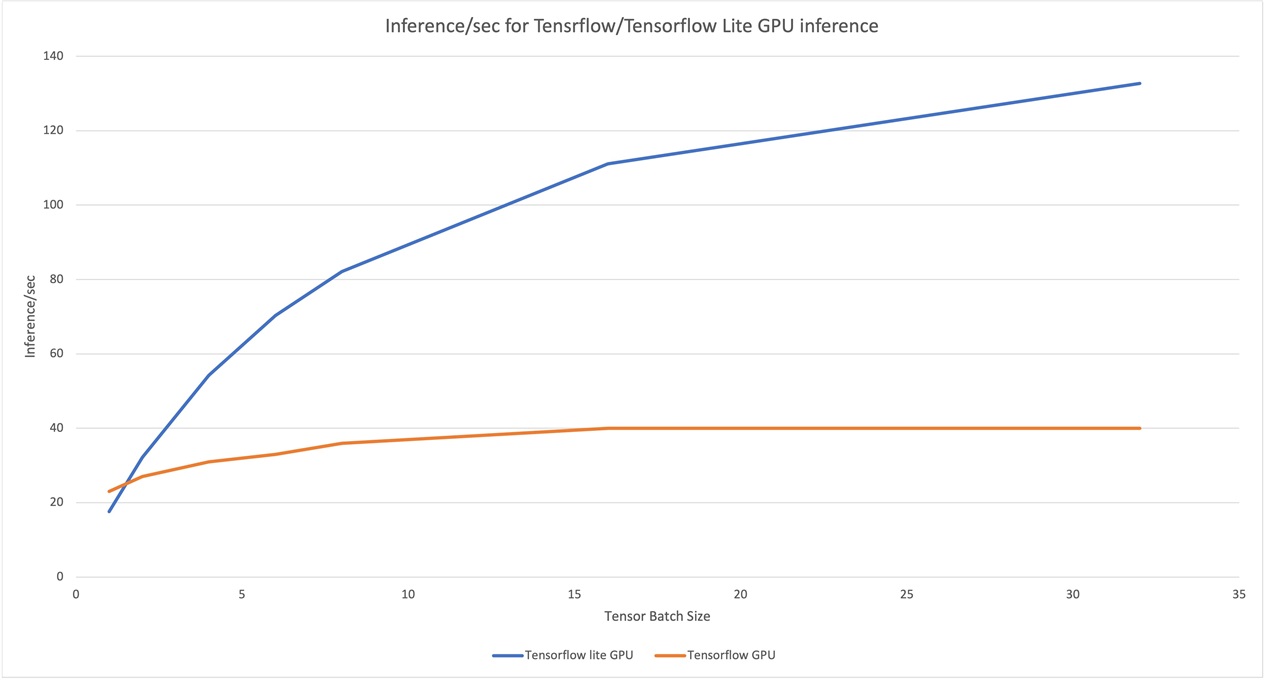 Figure 2. TensorFlow and TensorFlow Lite CPU/GPU inference
One of the major limitations of edge devices is the available memory. Hence, choosing the right inference tool can make a huge difference for applications to run smoothly. Benchmarking shows memory consumption of TensorFlow Lite is considerably lower compared to TensorFlow.
| Auto-batching: a feature that shouldn’t be missed. One of the important features of RedisAI is auto-batching. In the presence of many clients, sending data for inference (like classification on the images received from two separate cameras connected to a Jetson board), RedisAI is able to batch a specific number of the requests and run inference once. That will enhance the performance of the servers with many incoming requests. |
RedisAI inference example
The following is an example in Go, showing how to run RedisAI inference on a stream of data. Both Redis and RedisAI have Go clients (go-redis/redis and RedisAI/redisai-go) that help in efficiently writing an application for managing both streaming and inference on Redis.
The example reads model file graph.pb, which has two input tensors a and b of type float. The model multiplies the inputs and stores the result in tensor c. The inference backend is TensorFlow, and CPU is used as the inference device. The main function creates a goroutine that loads the model, reads the records (containing two numbers) from a Redis stream and runs inference on the numbers. The main routine generates pairs of random numbers and inserts them into the Redis stream, in order to be processed by the inference routine.
package main

import (
	"context"
	"fmt"
	"io"
	"log"
	"math/rand"
	"os"
	"strconv"
	"time"

	"github.com/RedisAI/redisai-go/redisai"
	redis "github.com/go-redis/redis/v8"
)

var redisAddress = "localhost:6379"

// model file
var modelFile = "graph.pb"
var inputs = []string{"a", "b"}
var outputs = []string{"c"}

var ctx = context.Background()

var numOfRecords = 10
var streamName = "inference_stream"
var modelName = "inference_model"
var inferenceEngine = "TF"
var device = "CPU"

func readModelFile() []byte {
	// read model file
	f, err := os.Open(modelFile)
	if err != nil {
		log.Fatalf("error opening file %s: %q", modelFile, err)
	}
	stats, _ := f.Stat()

	modelData := make([]byte, stats.Size())
	_, err = f.Read(modelData)
	if err != nil {
		if err != io.EOF {
			log.Fatalf("error reading file %s: %q", modelFile, err)
		}
	}
	f.Close()

	return modelData
}

func readStreamValues(s *redis.XStreamSliceCmd) (float32, float32) {
	val, err := s.Result()

	if err != nil {
		log.Fatal(err)
	}

	x, err := strconv.ParseFloat(val[0].Messages[0].Values[inputs[0]].(string), 32)
	if err != nil {
		log.Fatal(err)
	}

	y, err := strconv.ParseFloat(val[0].Messages[0].Values[inputs[1]].(string), 32)
	if err != nil {
		log.Fatal(err)
	}

	return float32(x), float32(y)
}

func inference(rdb *redis.Client) {
	modelData := readModelFile()

	client := redisai.Connect("redis://"+redisAddress, nil)

	// load the model
	err := client.ModelSet(modelName, inferenceEngine, device, modelData, inputs, outputs)
	if err != nil {
		log.Fatalf("error setting model: %q", err)
		return
	}

	// setup data stream to read
	var read = redis.XReadArgs{
		Streams: []string{streamName, "$"},
	}

	var s *redis.XStreamSliceCmd

	// tensor creations and inference has to be sent in a pipeline to Redis
	// in order to make the number of requests small and whole process faster

	for {
		// read from the stream
		s = rdb.XRead(ctx, &read)
		x, y := readStreamValues(s)

		log.Printf("%s: %f, %s, %f\n", inputs[0], x, inputs[1], y)

		// there is 4 operations that can run inside a pipeline
		client.Pipeline(4)

		err = client.TensorSet(inputs[0], redisai.TypeFloat, []int64{1}, []float32{x})
		if err != nil {
			log.Fatal(err)
		}

		err = client.TensorSet(inputs[1], redisai.TypeFloat, []int64{1}, []float32{y})
		if err != nil {
			log.Fatal(err)
		}

		err = client.ModelRun(modelName, inputs, outputs)
		if err != nil {
			log.Fatal(err)
		}

		_, err = client.TensorGet(outputs[0], redisai.TensorContentTypeValues)
		if err != nil {
			log.Fatal(err)
		}

		// ignore TensorSet
		_, err := client.Receive()
		if err != nil {
			log.Fatal(err)
		}

		// ignore TensorSet
		_, err = client.Receive()
		if err != nil {
			log.Fatal(err)
		}

		// ignore ModelRun
		_, err = client.Receive()
		if err != nil {
			log.Fatal(err)
		}

		// get the result of TensorGet
		err, _, _, data := redisai.ProcessTensorGetReply(client.Receive())
		if err != nil {
			log.Fatal(err)
		}

		// disable pipeline
		err = client.DisablePipeline()
		if err != nil {
			log.Fatalf("error disabling the pipeline: %v", err)
		}

		info, err := client.Info(modelName)
		if err != nil {
			log.Fatal(err)
		}

		log.Printf("output: %f", data)
		log.Printf("model run time: %sus\n", info["duration"])
		fmt.Println()
	}
	//	fmt.Println(st)
}

func main() {

	// create a pool of connections (in the case of cncurrency)
	rdb := redis.NewClient(&redis.Options{
		Addr:     redisAddress,
		Password: "",
		DB:       0,
		// it is possible to set the pool size. Default is 10/CPU.
	})

	defer rdb.Close()

	go inference(rdb)

	// data stream configuration
	var data redis.XAddArgs
	data.Stream = streamName
	data.ID = "*"

	// generate different rndom numbers on each run
	rand.Seed(time.Now().UnixNano())

	for i := 0; i < numOfRecords; i++ {
		// create random input
		data.Values = []interface{}{inputs[0], rand.Float32(), inputs[1], rand.Float32()}
		_ = rdb.XAdd(ctx, &data)

		// time gap between
		time.Sleep(100 * time.Millisecond)
	}

	// make sure all the results are collected
	time.Sleep(1 * time.Second)
}
Best Practice: using RedisAI pipelining Each run of the model requires multiple steps to be taken:
|
Redis Streams, Redis Gears, and RedisAI: Building an Edge inference system
As shown in the example above, initializing and synchronizing Redis Streams and RedisAI requires that Redis Gears becomes the programmatic way of gluing Redis components. Using Redis Gears allows users to write process pipelines in Python. Similar to RedisAI, Redis loads Redis Gears as a module and runs it close to the data source. Figure 4 shows the components of Redis Gears and how it interconnects with Redis and internal events. You can read more on how RedisGear works and find different examples on the RedisGears page.
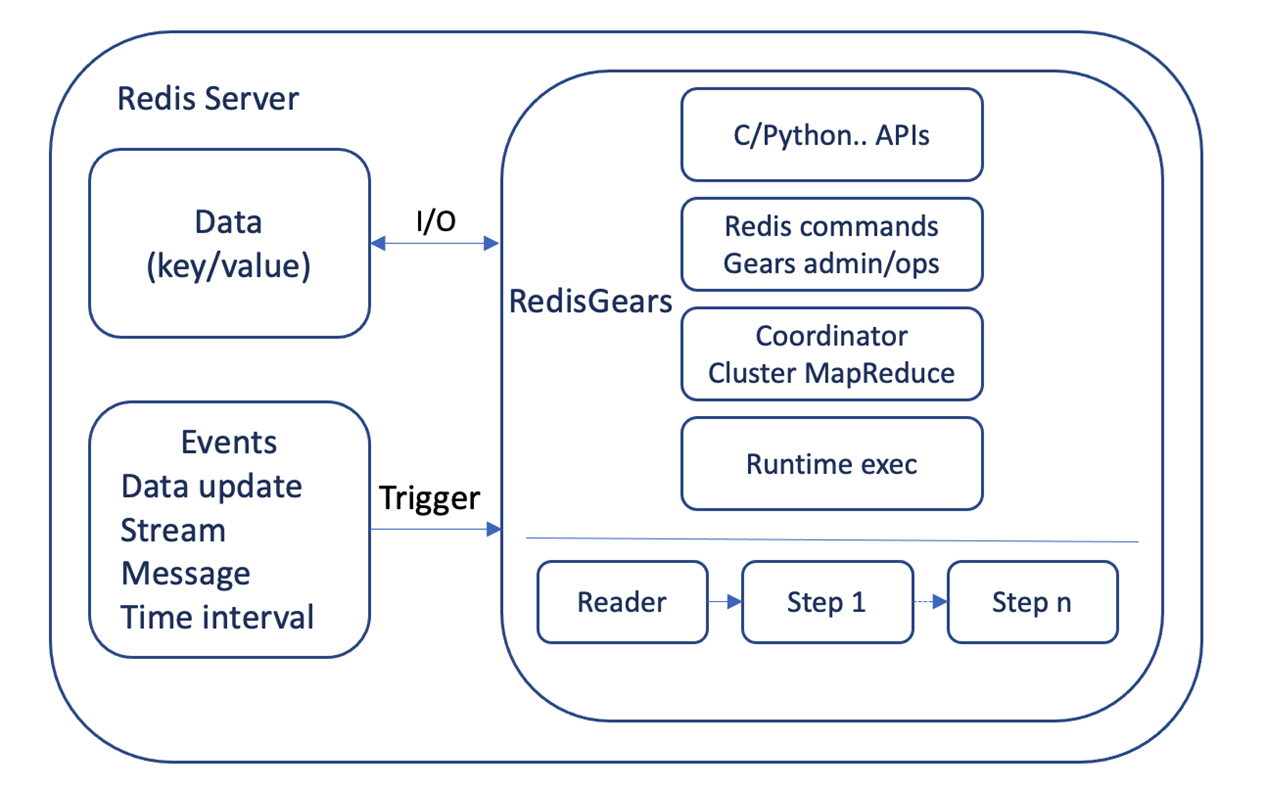 Figure 3: RedisGears components
We will demonstrate a practical image classification case study running on a small device (Jetson Nano) implemented by Redis Streams, Redis Gears, and RedisAI.
Animal Recognition Demo: A case study on Edge inference
The RedisAI team have provided several examples of practical applications. Here, we will show how to build and run the Animal Recognition Demo on Jetson Nano as an image classification system and orchestrate the deployment with K3s, a lightweight Kubernetes distribution that is optimized for Arm.
The case study uses MobileNetV2 image classification model to detect if an image captured by a camera is a cat. The components of the system are:
- Redis Server, with Redis Gears and RedisAI modules loaded.
- An application that loads the model with parameters and uploads the Gears script.
- A frontend that reads the stream of all images and shows them to the user.
- A frontend that reads the stream of cat images and shows them to the user.
The repository includes a docker-compose script that builds all the docker images and starts the whole system. However, we will show how to build the images for custom versions of Redis/RedisAI/RedisGears for Jetson boards with Arm processor and use Kubernetes for the deployments.
Initialization script (app/init.py)
The script shows the natural way of building a system with RedisAI and RedisGears. It (1) connects to Redis (2) uploads the model file (3) uploads the Gears script.
The Gears script handles the task flow. It (1) registers with the camera stream (2) adds all the images to the 'all' stream (3) selects one image out of 10 to reduce the rate (4) runs inference on the image (5) filters the cat images (6) adds them to 'cats' stream.
Frontend HTTP servers
Frontend HTTP servers (implemented as WebSocket servers in JavaScript) read the images from the streams ('cats' or 'all', depending on the environment variable 'STREAM') and send them to the browser.
Building the Docker images for Jetson
The following Dockerfile builds a Redis Server docker image with Redis Gears and RedisAI modules included. You can change the versions and enable/disable a specific machine learning backend. For instance, the following Dockerfile only enables TensorFlow and TensorFlow Lite backends and disable the rest. The final image already includes OpenCV for image processing on Redis Gears script.
ARG REDIS_VER=6.2.1
ARG GEARS_VER=1.2.1
ARG AI_VER=1.2.2

ARG OS=L4T

ARG OSNICK=bionic

# ARCH=x64|arm64v8|arm32v7
ARG ARCH=arm64v8

ARG PACK=0
ARG TEST=0

#----------------------------------------------------------------------------------------------
FROM redisfab/redis:${REDIS_VER}-${ARCH}-${OSNICK} AS redis
FROM redisfab/jetpack:4.4.1-${ARCH}-l4t AS builder

ARG OS
ARG ARCH
ARG REDIS_VER
ARG GEARS_VER
ARG AI_VER
ARG CUDA_VER

RUN echo "Building for $${OS} for ${ARCH} [with Redis ${REDIS_VER}]"

WORKDIR /build

RUN apt-get update
RUN apt-get install -y locales python3-dev
ENV LANG en_US.UTF-8

COPY --from=redis /usr/local/ /usr/local/

# build RedisAI
RUN  git clone --recursive --depth 1 --branch v${AI_VER} https://github.com/RedisAI/RedisAI.git

WORKDIR /build/RedisAI

RUN PIP=1 FORCE=1 ./opt/readies/bin/getpy3
RUN ./opt/system-setup.py

ARG DEPS_ARGS="GPU=1 WITH_PT=0 WITH_ORT=0 WITH_UNIT_TESTS=0"
RUN if [ "$DEPS_ARGS" = "" ]; then ./get_deps.sh; else env $DEPS_ARGS ./get_deps.sh; fi

ARG BUILD_ARGS="GPU=1 SHOW=1 WITH_PT=0 WITH_ORT=0 WITH_UNIT_TESTS=0"

RUN bash -c "set -e ;\
    . ./opt/readies/bin/sourced ./profile.d ;\
    make -C opt build $BUILD_ARGS"

# build RedisGears
WORKDIR /build

RUN git clone --recursive --depth 1 --branch v${GEARS_VER} https://github.com/RedisGears/RedisGears.git

WORKDIR /build/RedisGears

RUN ./deps/readies/bin/getpy2
RUN make setup && make fetch && make all

#----------------------------------------------------------------------------------------------
FROM nvcr.io/nvidia/l4t-base:r32.4.4

ARG ARCH
ARG GEARS_VER

ENV NVIDIA_VISIBLE_DEVICES all
ENV NVIDIA_DRIVER_CAPABILITIES compute,utility

RUN if [ ! -z $(command -v apt-get) ]; then apt-get -qq update; apt-get -q install -y libgomp1 build-essential libatlas-base-dev cmake ; fi
RUN if [ ! -z $(command -v yum) ]; then yum install -y libgomp; fi

ENV REDIS_MODULES /usr/lib/redis/modules
RUN mkdir -p $REDIS_MODULES/
RUN mkdir /artifacts

COPY --from=redis /usr/local/ /usr/local/
COPY --from=builder /build/RedisAI/install-gpu/ $REDIS_MODULES/
COPY --from=builder /build/RedisGears/bin/linux-${ARCH}-release/ $REDIS_MODULES/
COPY --from=builder /build/RedisGears/artifacts/release/ /artifacts/

RUN $REDIS_MODULES/python3_${GEARS_VER}/bin/python3 -m pip install --upgrade pip
RUN $REDIS_MODULES/python3_${GEARS_VER}/bin/python3 -m pip install setuptools==49.2.0

# build numpy from source to use ATLAS library
RUN env LD_LIBRARY_PATH=/usr/lib/aarch64-linux-gnu:$LD_LIBRARY_PATH $REDIS_MODULES/python3_${GEARS_VER}/bin/python3 -m pip install --no-binary :all: numpy
RUN $REDIS_MODULES/python3_${GEARS_VER}/bin/python3 -m pip install opencv-python imageio

EXPOSE 6379
ENTRYPOINT ["redis-server"]

ENV GEARS_VER ${GEARS_VER}

CMD ["--loadmodule", "/usr/lib/redis/modules/redisai.so", \
     "--loadmodule", "/usr/lib/redis/modules/redisgears.so", \
     "PythonHomeDir", "/usr/lib/redis/modules/python3_$GEARS_VER/", \
     "PythonInstallationDir", "/usr/lib/redis/modules/"]
For the demo, all required Dockerfiles for Jetson devices are included in the repository (with . jetson extension). Clone the repository, and build the docker images using the following commands:
git clone https://github.com/RedisGears/AnimalRecognitionDemo.git
cd AnimalRecognitionDemo

cd redis ; docker build -t demo/redis -f Dockerfile.jetson . ; cd ..
cd app ; docker build -t demo/app -f Dockerfile.jetson . ; cd ..
# frontend image uses the same Dockerfile for aarch64
cd frontend ; docker build -t demo/frontend . ; cd ..
cd camera ; docker build -t demo/camera -f Dockerfile.jetson . ; cd ..
To deploy the application on multiple nodes, you need to make the images accessible by uploading them on a Docker Registry. This can be a private registry running on local cluster, or one of public registries like Docker Hub or Amazon ECR.
Configuring container runtime on NVIDIA Jetson Nano
Jetson Nano is specifically designed to run GPU-powered AI applications. Hence, containerized applications need the permission to access available GPUs to run computations. For this, NVIDIA provides its own runtime on Linux4Tegra operating system (customized Linux for Jetson), which can be used as default docker runtime. Make sure that the NVIDIA container runtime is set as default in the Docker configuration file (/etc/docker/daemon.json), and then restart docker service:
cat /etc/docker/daemon.json
{
    "default-runtime": "nvidia",
    "runtimes": {
        "nvidia": {
            "path": "nvidia-container-runtime",
            "runtimeArgs": []
        }
    }
}
Application deployment using Kubernetes
Kubernetes is one of the well-known container orchestration platforms. K3s (by Rancher) is a certified Kubernetes distribution designed for IoT devices and is tuned for Arm processors. This section describes how to run the demo using K3s.
The installation of the K3s API server and the agent is straightforward. Natively, K3S uses containerd as the container runtime to benefit from its lightweight performance. However, it is still possible to configure K3s to use Docker runtime on Jetson Nano:
export K3S_URL=https://<K3S-SERVER-IP>:<K3S-SERVER-PORT>

# find the node token on the server is stored in:
#  /var/lib/rancher/k3s/server/node-token
export K3S_TOKEN=<NODE-TOKEN>

curl -sfL http://get.k3s.io | K3S_URL=$K3S_URL K3S_TOKEN=$K3S_TOKEN sh -s - --docker|
Note on server-side configuration If the server is running behind a gateway (e.g., inside an AWS VPC), the external IP address has to be added to the server certificate. In addition, an external IP address had get advertised to the nodes in the cluster. This can be configured using the following installation script: |
System deployment
IoT applications may run on many nodes in a cluster. For instance, a face detection application may run on all the edge devices connected to the cameras around a building, while the same anomaly detection software runs on similar machinery in a manufacturing plant. Therefore, a mechanism is required to manage all the applications with the specification on multiple nodes. In Kubernetes framework, IoT applications can run as DaemonSets, or pods on all the nodes with specific properties. The following YAML file describes the Animal Recognition Application DaemonSet. It runs on all the nodes that have label ‘device=jetson-nano’. The initialization script of the demo runs inside a Kubernetes job, since it has to run once, initialize RedisAI, and then terminate.
apiVersion: apps/v1
kind: DaemonSet
metadata:
  name: animal-ds
  namespace: default
spec:
  selector:
    matchLabels:
      app: animal-recognition
  template:
    metadata:
      labels:
        app: animal-recognition
    spec:
      nodeSelector:
        device: jetson-nano
      hostNetwork: true
      containers:
      - name: redis
        image: demo/redis
        imagePullPolicy: IfNotPresent
        ports:
        - containerPort: 6379
      - name: weball
        image: demo/frontend
        imagePullPolicy: IfNotPresent
        ports:
        - containerPort: 3000
        env:
        - name: STREAM
          value: all
        - name: REDIS_HOST
          value: localhost
      - name: webcats
        image: demo/frontend
        imagePullPolicy: IfNotPresent
        ports:
        - containerPort: 3001
        env:
        - name: STREAM
          value: cats
        - name: REDIS_HOST
          value: localhost
        - name: PORT
          value: "3001"
      - name: camera
        image: demo/camera
        imagePullPolicy: IfNotPresent
        command: ["python3"]
        args: ["./read_camera_jetson.py"]
        securityContext:
          privileged: true
          allowPrivilegeEscalation: true
        env:
        - name: ANIMAL
          value: cat
        volumeMounts:
        - mountPath: /dev/video0
          name: camera
        - mountPath: /tmp/argus_socket
          name: argus
      volumes:
      - name: camera
        hostPath:
          path: /dev/video0
      - name: argus
        hostPath:
          path: /tmp/argus_socket
---
apiVersion: batch/v1
kind: Job
metadata:
  name: app
spec:
  template:
    spec:
      nodeSelector:
        device: jetson-nano
      hostNetwork: true
      containers:
      - name: app
        image: demo/app
        imagePullPolicy: IfNotPresent
        command: ["python3"]
        args: ["init.py", "--url", "redis://localhost:6379"]
      restartPolicy: Never
  backoffLimit: 10
To deploy the above DaemonSet, first make sure that the node is connected to k3s cluster:
$ kubectl get nodes

NAME               STATUS   ROLES                 AGE    VERSION
arm-jetson         Ready    <none>                5h27m  v1.20.4+k3s1
ip-172-31-38-192   Ready    control-plane,master  2d3h   v1.20.4+k3s1
And that you have labeled the node properly using the following command (device=jetson-nano for the demo DaemonSet)
$ kubectl label nodes arm-jetson device=jetson-nanoApply the DaemonSet configuration (stored in animal-recognition-demo.yaml) in order to deploy it into the cluster:
$ kubectl apply -f animal-recognition-demo.yaml
kubectl apply -f animal-recognition-demo.yaml
daemonset.apps/animal-ds created
job.batch/app created

$ kubectl get daemonsets
NAME        DESIRED   CURRENT   READY   UP-TO-DATE   AVAILABLE   NODE SELECTOR        AGE
animal-ds   1         1         1       1            1           device=jetson-nano   24s

$ kubectl get pods
NAME              READY   STATUS        RESTARTS   AGE
animal-ds-bgkbd   4/4     Running       0          45s
app-28hf7         0/1     Completed     0          42s
The results above show that the animal-ds-bgkbd pod with 4 containers (Redis, camera, and frontends) is running, and the app-28hf7 pod has completed the initialization job successfully.
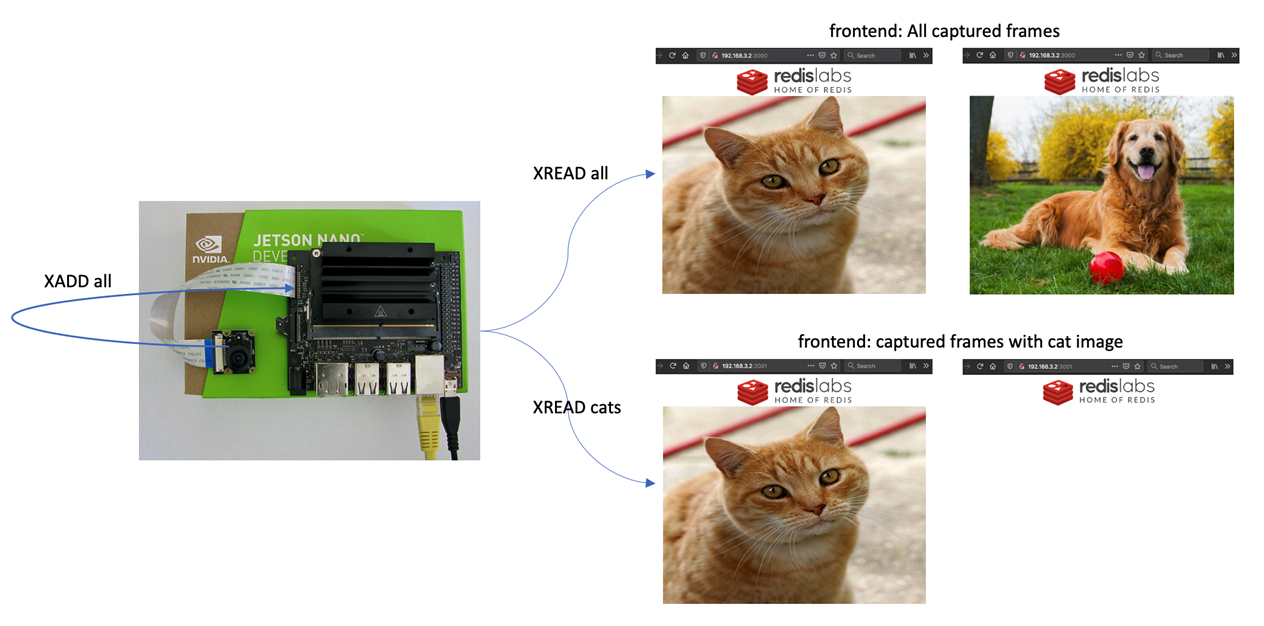
Animal Recognition in action
Jetson Nano 4GB has two CSI interfaces to connect cameras to (Jetson Nano 2GB has one CSI interface). A single camera gets accessible through /dev/video0, which is also mounted inside the camera container. The camera container reads images from the device every 0.1 seconds and adds them to the corresponding stream (camera:0), where the gears script reads, resizes, and applies inference on the frames.
The containers in the pods are connected to the host network, therefore they can be accessed similar to a service running directly on the machine. Two frontends can be accessed via
- http://<node-IP-address>:3000 for all captured frames
- http://<node-IP-address>:3001 for all captured frames with cat image
Figure 4 shows the frontends when capturing a cat image vs dog image.
Conclusion
RedisAI throughput is shown to outperforms other platforms (such as TorchServe, TensorFlow Serving, and common HTTP server) while offering minimum latency. The low memory footprint also makes it suitable to run on edge devices that are specifically designed for machine learning applications.
For our benchmarks, we selected Jetson Nano as a power efficient edge device for AI applications. While TensorFlow performs well on Jetson Nano for models such as MobileNetV1, it is not well suited to run on small devices. TensorFlow Lite is a framework used for IoT and mobile inference. Benchmarking the same model on TensorFlow Lite backend shows it can handle higher inference rates using lower memory compared to TensorFlow.
Try other RedisAI examples
RedisAI has provided several case studies on using RedisAI, Redis Streams and Redis Gears. You can read more about the case studies, codes, and deployments on Redis website.

Re-use is only permitted for informational and non-commercial or personal use only.
