Open vSwitch with DPDK on Arm, Chapter 3: Setup for PHY-VM-PHY (vHost Loopback) Test
In the fourth blog of this series, Open vSwitch with DPDK on Arm, find out how to setup the environment for running the PHY-VM-PHY (vHost Loopback) test in Open vSwitch on Arm platforms.

Overview
This is Chapter 3 of the blog series: Open vSwitch with DPDK on Arm. This blog describes how to setup OvS with DPDK to run the PHY-VM-PHY or vHost-Loopback traffic test on an Arm platform. The high-level steps, in order, are:
- Prerequisites
- QEMU Installation
- QEMU Setup and VM Install
- PHY-VM-PHY Setup
This blog assumes that you have built and installed OvS with DPDK in your home directory on your Arm platform. This Arm platform which serves as the Device Under Test (DUT) for the traffic test. If you have not completed those steps, please refer to Chapter 1: Build and Install of this blog series.
Prerequisites
Before proceeding ahead, please complete the exact steps listed under the following headings from my previous blog — Chapter 2: Setup for PHY-PHY Test
- Prerequisite: Isolate CPUs
- Hugepages Configuration
- DPDK Setup
- OvS Setup with DPDK Configuration for OvS
QEMU Installation
1. Install the following package requirements if they are not present on your system.
$ sudo apt-get install git libglib2.0-dev libfdt-dev libpixman-1-dev zlib1g-dev2. Get QEMU software from source.
$ git clone git://git.qemu.org/qemu.git3. Switch to the QEMU directory and prepare a native build directory.
$ cd $HOME/qemu
$ mkdir -p bin
4. Configure and build QEMU.
$ cd $HOME/qemu/bin
$ ../configure --target-list=aarch64-softmmu --prefix=$HOME/usr --enable-debug --extra-cflags='-g'
$ make -j32
QEMU Setup and VM Install
1. Before proceeding ahead, you need to check if your current hardware supports the necessary Virtualization Extensions for KVM. I enable KVM during the guest VM installation as QEMU virtualization and performance will be much faster and efficient if KVM is enabled at the time of compilation. You can perform this check by first installing the cpu-checker on your platform and then entering sudo kvm-ok in a terminal prompt.
$ sudo apt install cpu-checker
$ sudo kvm-ok
If the following message is printed, then the system has KVM virtualization support and it has been enabled.
INFO: /dev/kvm exists
KVM acceleration can be used
But, if a similar message to the following is printed, then it is likely to be one of two following possibilities:
- KVM virtualization is not supported by your hardware
- KVM virtualization has not been enabled in the BIOS settings
INFO: Your CPU does not support KVM extensions
KVM acceleration can NOT be used
2. Download an .iso image file. I have chosen Bionic, i.e., Ubuntu 18.04 as a guest VM to install with QEMU.
$ cd $HOME/qemu/bin
$ mkdir -p isos
$ cd $HOME/qemu/bin/isos
$ wget http://ports.ubuntu.com/ubuntu-ports/dists/bionic/main/installer-arm64/current/images/netboot/mini.iso
3. Download the UEFI image for QEMU’s virt machine type. The EDK II derived snapshot image from Linaro is used for this purpose. Decompress the UEFI image after download.
$ cd $HOME/qemu/bin
$ mkdir -p images
$ cd $HOME/qemu/bin/images
$ wget http://snapshots.linaro.org/components/kernel/leg-virt-tianocore-edk2-upstream/latest/QEMU-AARCH64/RELEASE_GCC5/QEMU_EFI.img.gz
$ gunzip QEMU_EFI.img.gz
4. Create the main disk image for the VM and a much smaller image to store the EFI variable. This is done with the help of the qemu-img command. The disk's format is specified with the -f parameter; the file is created in qcow2 format, so that only the non-empty sectors are written in the file. The full path to the image file is then specified. The last parameter is the maximum size to which the image file can grow. The image is created as a sparse file that grows when the disk is filled with data.
$ cd $HOME/qemu/bin/images
$ ../qemu-img create -f qcow2 ubuntu1804.img 128G
$ ../qemu-img create -f qcow2 varstore.img 64M
5. Use the dd command to copy the QEFI image downloaded from Linaro.
$ cd $HOME/qemu/bin/images
$ dd if=QEMU_EFI.img of=varstore.img
6. Run QEMU with KVM enabled. The Ubuntu installer will boot automatically after the following command is executed and it takes you through the standard Ubuntu installation process.
$ cd $HOME/qemu/bin
$ sudo ./aarch64-softmmu/qemu-system-aarch64 \
       -m 4096 -cpu host -enable-kvm -machine virt,gic_version=host -nographic \
       -drive if=pflash,format=raw,file=./images/QEMU_EFI.img \
       -drive if=pflash,format=raw,file=./images/varstore.img \
       -drive if=virtio,file=./images/ubuntu1804.img,cache=none \
       -drive if=virtio,format=raw,file=./isos/mini.iso
The options passed in the previous command are explained in the following. For a complete list of options to use with QEMU, refer to the QEMU documentation.
-
-m:Specifies the amount of memory; default is 128MB. If memory is to be specified in Megabyte, or Gigabyte then the appropriate suffix, M for Megabyte or G for Gigabyte is used. -
-cpu:Specifies a processor to emulate. It is recommended to emulate the host processor. -
-enable-kvm:Enable full KVM virtualization support. This option is only available if KVM support is enabled when compiling. -
-machine:Specifies the machine type. For 64-bit Arm, “virt” is the best choice because Arm QEMU emulates fewer boards, unless you specifically know that you want to emulate one of 64-bit Xilinx boards. It does not correspond to any real hardware and is designed for use in virtual machines. It supports PCI,virtio, recent CPUs, and large amounts of RAM. -
-nographic:Disables graphical output so that QEMU is a simple command-line application. -
-drive:Defines a new drive. This includes creating a block driver node (the backend) and a guest device. This option accepts sub-options and the ones referenced in the following commands are listed:-
File:Defines which disk image to use with this drive. -
Format:Specify which disk format is used rather than detecting the format. QEMU displays a warning if this option is not specified. -
If:Defines on which type of interface the drive is connected. Available types areide,scsi,sd,mtd,floppy,pflash,virtio, none.
-
7. Once the installation completes, start the guest VM again with QEMU using the following command. It is essentially the exact same command as before with the exception of the final -drive option which has been removed. The default boot device after installation is recorded in varstore.img and the Ubuntu installation is inside ubuntu1804.img.
$ cd $HOME/qemu/bin
$ sudo ./aarch64-softmmu/qemu-system-aarch64 \
-m 4096 -cpu host -enable-kvm -machine virt,gic_version=host -nographic \
-drive if=pflash,format=raw,file=./images/QEMU_EFI.img \
-drive if=pflash,format=raw,file=./images/varstore.img \
-drive if=virtio,file=./images/ubuntu1804.img

Ubuntu 18.04.2 LTS ubuntu-aarch64 ttyAMA0
ubuntu-aarch64 login:
8. Install essential packages in the guest VM.
$ sudo apt-get install build-essential
$ sudo apt-get install git numactl libnuma-dev bc device-tree-compiler dh-autoreconf curl
9. Download and install DPDK in the guest VM. Use the 'arm64-armv8a-linuxapp-gcc' generic configuration file for building DPDK. QEMU might not have been able to emulate the host completely and thus may support only some of the features of the host platform.
$ wget http://fast.dpdk.org/rel/dpdk-19.11.tar.xz
$ tar xf dpdk-19.11.tar.xz
$ cd $HOME/dpdk-19.11
$ make config T=arm64-armv8a-linuxapp-gcc
$ export RTE_SDK=$HOME/dpdk-19.11
$ export RTE_TARGET=arm64-armv8a-linuxapp-gcc
$ sudo make -j32 install T=$RTE_TARGET DESTDIR=install
Close the QEMU process in the shell: Press Ctrl+a and then x.
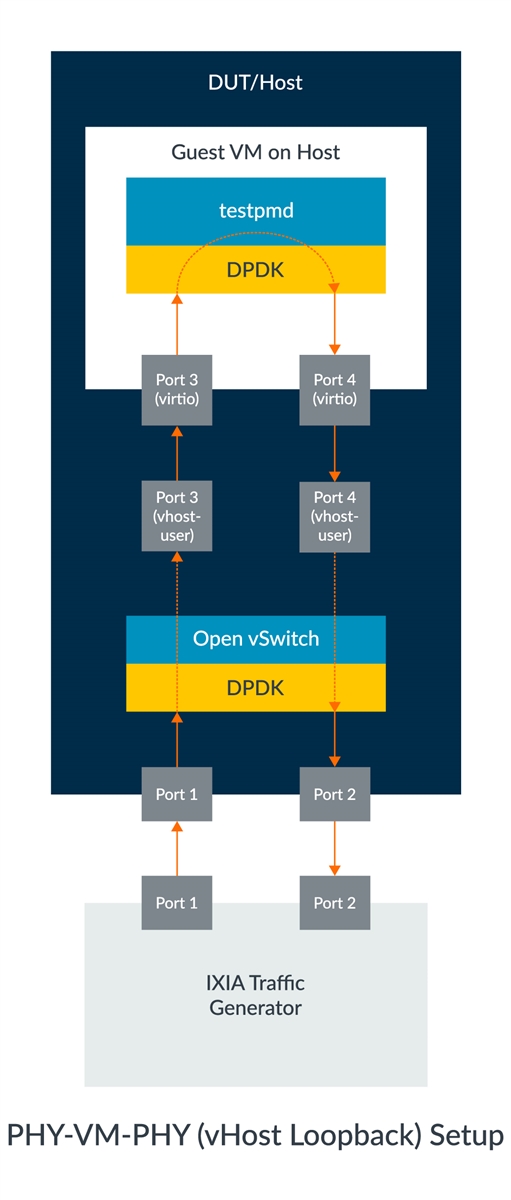
PHY-VM-PHY Setup
1. Add a user space bridge. The ovs-vsctl utility can be used for this purpose. Bridges should be created with a datapath_type=netdev.
$ cd $HOME/usr/bin
$ sudo ./ovs-vsctl add-br dpdk-br1 -- set bridge dpdk-br1 datapath_type=netdev
2. Add two DPDK ports. The ovs-vsctl utility can also be used for this.
$ sudo ./ovs-vsctl add-port dpdk-br1 dpdk1 -- set Interface dpdk1 type=dpdk options:dpdk-devargs=<pci_address_1> ofport_request=1
$ sudo ./ovs-vsctl add-port dpdk-br1 dpdk2 -- set Interface dpdk2 type=dpdk options:dpdk-devargs=<pci_address_2> ofport_request=2
3. Add two DPDK vHost User ports. This action creates two sockets at $HOME/var/run/openvswitch/vhost-user*, which must be provided to the VM on the QEMU command line.
$ sudo ./ovs-vsctl add-port dpdk-br1 vhost-user1 -- set Interface vhost-user1 type=dpdkvhostuser ofport_request=3
$ sudo ./ovs-vsctl add-port dpdk-br1 vhost-user2 -- set Interface vhost-user2 type=dpdkvhostuser ofport_request=4
4. Add test flows to forward packets between DPDK ports and vhost-user ports. The flows have been configured such that traffic transmitted into either port is seen returned with the other port.
$ sudo ./ovs-ofctl del-flows dpdk-br1
$ sudo ./ovs-ofctl add-flow dpdk-br1 in_port=1,action=output:3
$ sudo ./ovs-ofctl add-flow dpdk-br1 in_port=2,action=output:4
$ sudo ./ovs-ofctl add-flow dpdk-br1 in_port=3,action=output:1
$ sudo ./ovs-ofctl add-flow dpdk-br1 in_port=4,action=output:2
5. Bring up the bridge and its interfaces.
$ sudo ip link set dpdk-br1 up6. Start the VM guest with the vhost-user1 and vhost-user2 ports.
$ cd $HOME/qemu/bin
$ taskset -c 1,2,3,4 \
sudo ./aarch64-softmmu/qemu-system-aarch64 \
-cpu host -machine virt,gic-version=host -enable-kvm -nographic \
-m 2048M -numa node,memdev=mem -mem-prealloc -smp sockets=1,cores=2 \
-drive if=pflash,format=raw,file=./images/QEMU_EFI.img \
-drive if=pflash,format=raw,file=./images/varstore.img \
-drive if=virtio,file=./images/ubuntu1804.img \
-object memory-backend-file,id=mem,size=2048M,mem-path=/dev/hugepages,share=on \
-chardev socket,id=char1,path=$VHOST_SOCK_DIR/vhost-user1 \
-netdev type=vhost-user,id=mynet1,chardev=char1,vhostforce \
-device virtio-net-pci,netdev=mynet1,mac=00:00:00:00:00:01,mrg_rxbuf=off \
-chardev socket,id=char2,path=$VHOST_SOCK_DIR/vhost-user2 \
-netdev type=vhost-user,id=mynet2,chardev=char2,vhostforce \
-device virtio-net-pci,netdev=mynet2,mac=00:00:00:00:00:02,mrg_rxbuf=off
Some of the previous options have been explained in previous sections. The remainder is explained in the following:
-
taskset:Sets the CPU affinity of the QEMU process. -
-smp:Specifies the number of virtual CPUs, cores, and threads the guest is permitted to use. The number can be higher than the available cores on the host system. -
-numa node:Defines a NUMA node and assigns RAM and VCPUs to it.memdevassigns RAM from a given memory backend device to a node. This memory backend device is created as explained in the following. -object memory-backend-file:Creates a memory file backend object, which can be used to back the guest RAM with hugepages. Theidparameter is a unique ID that is used to reference this memory region when configuring the-numaargument. Thesizeoption provides the size of the memory region. Themem-pathprovides the path to either a shared memory or huge page filesystem mount,/dev/hugepagesin this case. TheshareBoolean option determines whether the memory region is marked as private to QEMU, or shared. The latter allows a cooperating external process to access the QEMU memory region.-mem-prealloc:Pre-allocates memory when using-mem-path.-
-chardev:Specifies the character device backend. In this case, a two-way Unix stream socket is created since a path is specified. Note that a differentchardevpath needs to be specified for eachvhost-userdevice. -
-netdev type=vhost-user:Establishes avhost-user netdevbacked by achardev. Thechardevshould be a Unix domain socket backend one. Thevhost-useruses a specifically defined protocol to passvhost ioctlreplacement messages to an application on the other end of the socket. On non-MSIX guests, the feature can be forced withvhostforce. -
-device virtio:Adds avirtiodevice driver. Valid properties depend on the driver.
7. Once the guest VM has been started, allocate and mount hugepages if they are not already mounted by default.
$ sudo sysctl vm.nr_hugepages=512
$ mount | grep hugetlbfs
$ sudo mount -t hugetlbfs hugetlbfs /dev/hugepages
8. Insert the vfio-pci kernel modules so that you can bind the passed vhost-user interfaces to the vfio-pci driver in the next step.
$ sudo modprobe -r vfio_iommu_type1
$ sudo modprobe -r vfio
$ sudo modprobe vfio enable_unsafe_noiommu_mode=1
$ cat /sys/module/vfio/parameters/enable_unsafe_noiommu_mode
$ sudo modprobe vfio-pci
9. Bind the vhost-user interfaces to the vfio-pci driver. Use the first command to list all the network devices currently detected by the guest VM.
$ sudo $HOME/dpdk-19.11/usertools/dpdk-devbind.py --status
$ sudo $HOME/dpdk-19.11/usertools/dpdk-devbind.py -b vfio-pci <pci_address_1> <pci_address_2>
Sometimes, an error can come up in regard to running python such as:
ubuntu /usr/bin/env: python: No such file or directoryThis can be resolved by pointing python to python3 by using the following command-line tool update-alternatives:
$ sudo update-alternatives --config pythonIf you get another error such as "no alternatives for python", then you need to set up an alternative with the following command:
$ sudo update-alternatives --install /usr/bin/python python /usr/bin/python3 1010. Compile testpmd application on DPDK in the guest VM.
$ export RTE_SDK=$HOME/dpdk-19.11
$ export RTE_TARGET=arm64-armv8a-linuxapp-gcc
$ make
11. Start the testpmd application and enable I/O forwarding mode.
$ cd $HOME/dpdk-19.11/app/test-pmd
$ sudo ./testpmd -c 0x3 -n 4 -- --burst=64 -i
testpmd> set fwd io retry
testpmd> start
At this point, the setup for PHY-VM-PHY test is complete and all you need to do know is to configure your traffic generator to send traffic to the DUT.
Closing Remarks
This blog provided a step-by-step tutorial of how to setup OvS with DPDK for the PHY-VM-PHY test. It is a very comprehensive guide; in addition to the OvS and DPDK setups, it also shows how to install a guest VM on Arm platforms. The QEMU command-line options are also explained in detail to help the user understand its significance and allow them to customize it according to their requirements. Another noteworthy point in this blog is that it shows how to load and use the vfio driver instead of the uio driver for vhost-user interfaces in the guest VM.
Other Blogs in the Series
Re-use is only permitted for informational and non-commercial or personal use only.
