Beyond menus: Building an AI assistant for a mobile app
How the on-device Smart Gallery enables more natural, private user experiences on Android.
By Lin Xu
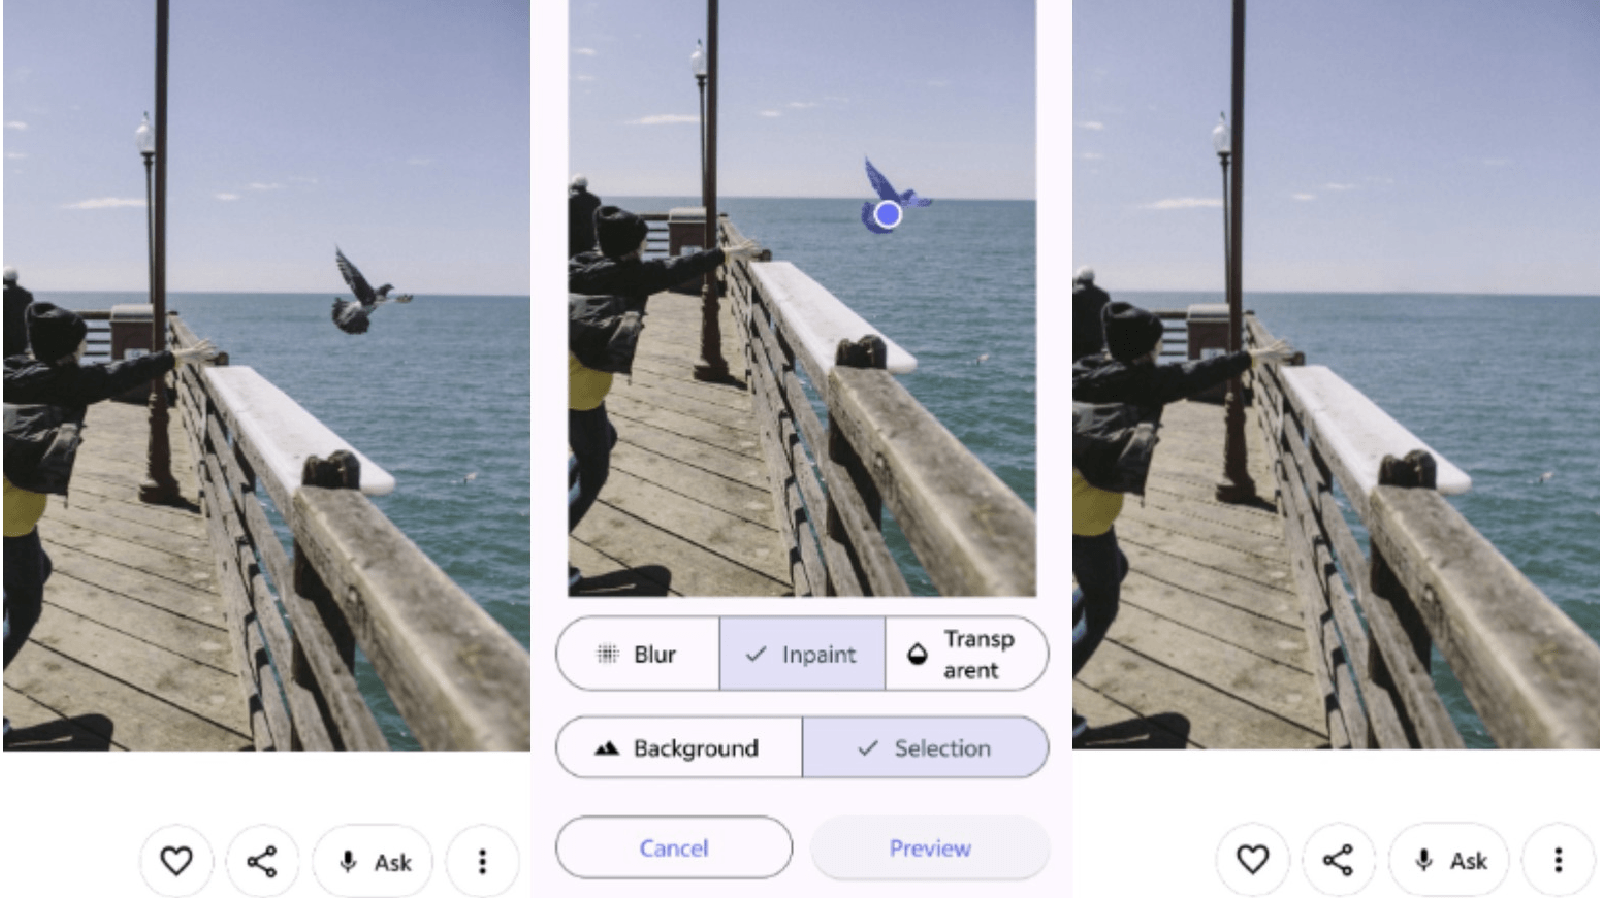
As on-device AI becomes practical on modern smartphones, developers can build applications that are more intuitive, responsive and privacy-preserving. This project demonstrates how AI assistants that run entirely on-device can improve the user experience by enabling natural voice interactions while taking advantage of the performance and efficiency of today’s Arm-based devices, with even greater acceleration on CPUs that support Arm SME2.
Smart Gallery: from voice commands to an edited photo
Most gallery apps rely on tapping, scrolling, and menus. You open a photo, choose an action, adjust a setting, and repeat the process.
For this project, I explored a different interaction: what if a gallery app could understand a spoken command and simplify photo sorting and editing?
The result is the Speech-Directed AI Assistant Gallery, an on-device AI assistant built on the open-source Aves Gallery app. Instead of manually navigating through editing tools, the user can say things like “remove this object”, or “create an album with all the photos of Sarah”, and the app turns those words into real actions.
Why is the AI assistant on-device? Privacy.
Gallery apps contain personal photos, faces, screenshots, locations, and private memories. Voice commands can also reveal personal information. For that reason, the assistant uses on-device processing. Therefore, speech recognition, command parsing, face matching, segmentation, and image editing all run locally. The app does not send the user's photos or spoken commands to a cloud service.
What I built
Rather than recreate standard photo gallery functionality, I extended the existing open source Aves Gallery with a voice assistant layer. Aves already has a strong Android gallery interface, supports many media features, and has an open-source codebase that can be modified.
Figure 1 shows the user-facing workflow,: open a photo, speak a command, preview the result, and save it only if you are happy with the result.
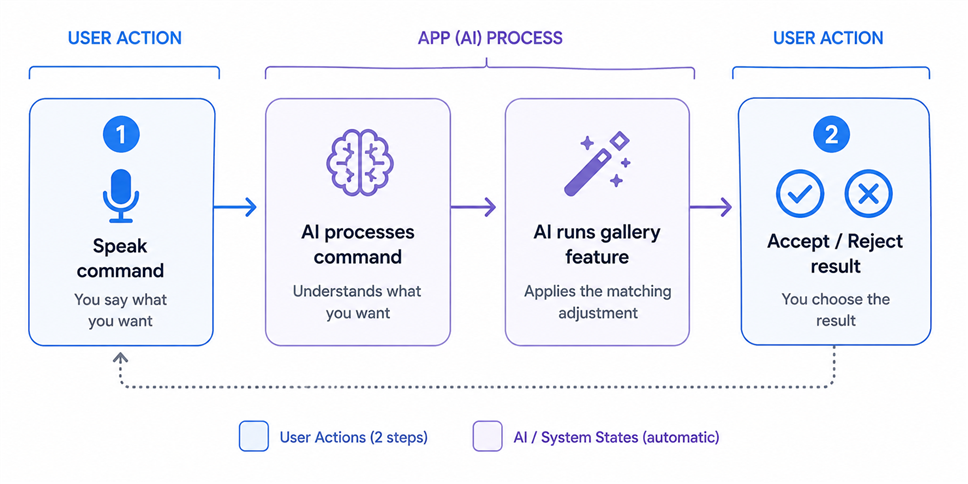
Figure 1: AI assistant flow
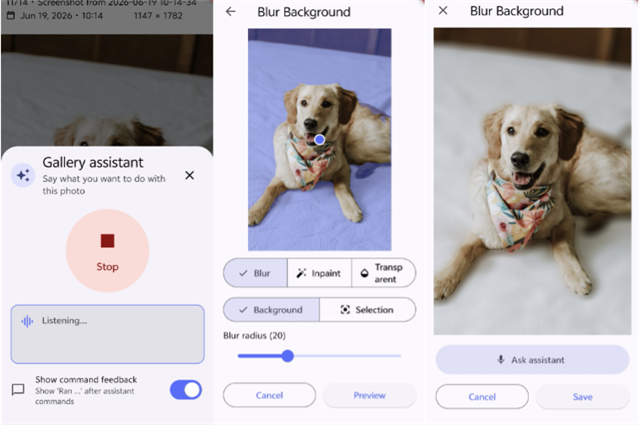
Figure 2: Step by step background blurring demo
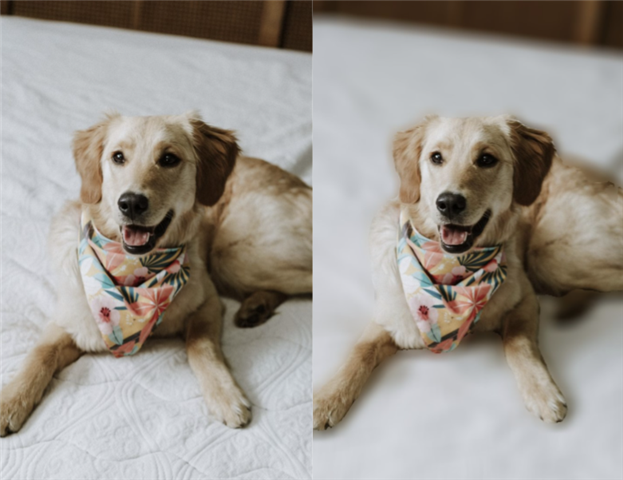
Figure 3: Before and after background blurring.
The assistant currently supports commands for image filters, background removal, background blur, object removal, and grouping photos of a person.
Users do not need to know which model is running or where a feature lives in the menu. They describe what they want, and the app maps the request to the appropriate local feature.
Demo Video
This video demonstration shows how the app executes different features.
High-Level Architecture
Before going into each model separately, it helps to understand the complete path from a voice command to a gallery action.
Aves Gallery already uses Flutter for much of its user interface, so I built the assistant UI in that same Flutter layer. This includes the assistant sheet, transcript display, quick actions, preview navigation, and progress dialogs.
Kotlin handles many of the heavier Android-native components including microphone capture, local model runtimes, bitmap decoding, image processing, compositing, and saving through Android APIs. Flutter and Kotlin communicate through platform channels. The Flutter UI can request that the native Kotlin layer run speech recognition, parse a command, or generate an edited preview.
The end-to-end architecture is shown in Figure 4. The important thing to notice is that the assistant is not a single model. It is a pipeline: speech becomes text, text becomes a structured command, and the command is routed to the appropriate gallery feature.
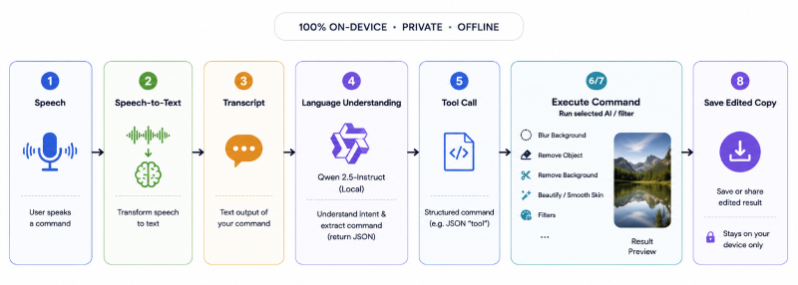
Figure 4: App architecture. This diagram shows the AI models involved end-to-end in the app.
Speech-to-text (STT): SenseVoiceSmall + sherpa.onnx
The pipeline starts with SenseVoiceSmall, a speech-to-text (STT) model that runs through sherpa.onnx.
SenseVoice is a speech understanding model that supports several features. The app only uses its speech recognition capability to convert a short voice command into a transcript.
Although there is a SenseVoiceLarge variant which is heavier and more powerful, the SenseVoiceSmall is better suited to low-latency local commands. It does not need to support long-form dictation, it only needs to recognize short commands such as “Apply sepia” and “Remove this object”.
Sherpa.onnx is the runtime layer that makes this usable inside the Android app. It handles the model loading, the audio input pipeline, and the inference interface. SenseVoiceSmall is the model that provides the speech recognition.
The speech pipeline is:
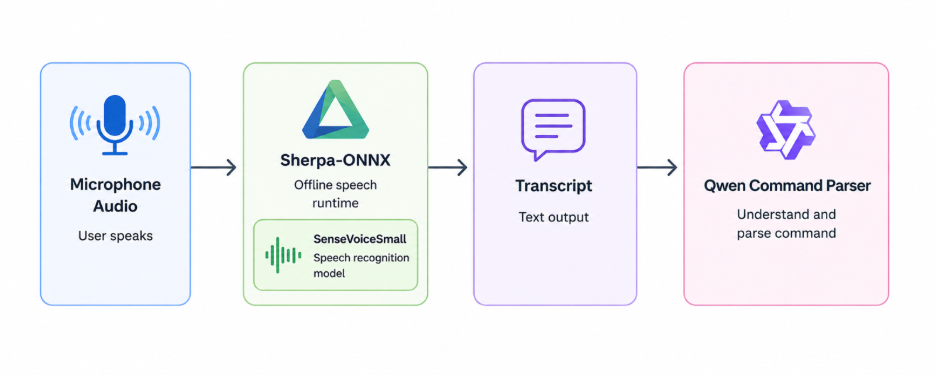
Figure 5: Speech to text pipeline
In our testing, the warmed-up STT inference took around 800 ms for 10 seconds of audio. However, a simple command like “Blur background” is less than 1 second of audio. The full benchmark results are in the benchmarking section.
Command understanding: Qwen2.5-Instruct
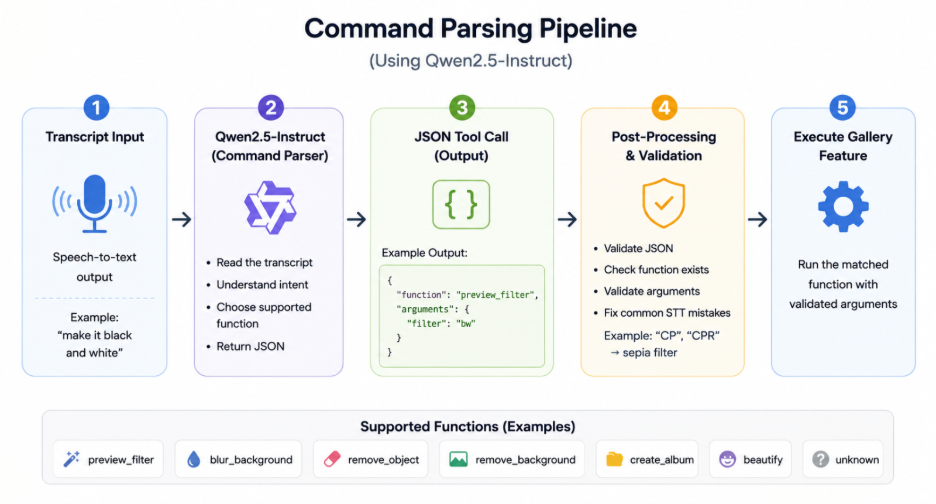
Figure 6: Command Parsing Pipeline
Speech-to-text gives the app a transcript, but the transcript is not yet an action.
For example, after the user says, “Make it black and white”, the app receives plain text. A person can understand the request easily, but the gallery code needs something more specific. It needs to know exactly which function to run and which settings to use.
So, how do we turn natural language into a computer command?
That is where Qwen 2.5-Instruct comes in.
Qwen runs locally as a command parser. It is not used as a chatbot. It does not generate long responses or hold conversations with the user. Instead, its role is to:
- Read the transcript.
- Choose one supported function.
- Return JSON.
For example, “Make it black and white”. The pipeline converts the transcript into a tool call.
{
  "function": "preview_filter",
  "arguments": {
    "filter": "bw"
  }
}
This is the JSON object. It is the bridge between natural language and the app.
Fine-tuning
A general instruction model can understand the meaning of “Make it black and white”, but it does not know an app's internal function names or JSON format. To address this, I fine-tuned Qwen2.5-0.5B-Instruct with examples of gallery commands and their corresponding tool calls using LLaMA Factory.
The dataset included:
- English commands
- Chinese commands
- Mixed-language commands
- Unsupported commands mapped to “unknown”
Even after fine-tuning, the app post-processes the output before running the command. It verifies that the JSON is valid, the function exists, and the arguments are safe. There is also a small rule-based fallback for common speech mistakes. For example, if STT hears “sepia” as “CP” or “CPR”, the fallback still maps the command back to the sepia filter.
Features
I started with a small set of gallery features:
- Image Filters and adjustments
- Person album creation
- Object Removal
- Background Editing
Filters
The user can say commands such as “Increase contrast” or “Make it brighter”. This was the first feature I added because it was the simplest way to test the assistant pipeline end to end.
These filters use a color matrix transformation as the core operation. Every pixel in an image has red, green, blue and alpha values (RBGA). A color matrix transforms those values using matrix multiplication.
For example, the color matrix for a black-and-white filter looks like this:
R' = 0.299R + 0.587G + 0.114B

G' = 0.299R + 0.587G + 0.114B

B' = 0.299R + 0.587G + 0.114B
A brightness filter adds an offset to the color channels, making the image lighter or darker, while a contrast filter scales the distance of each color value from the midpoint.
Creating Person Albums: ML Kit + MobileFaceNet
This feature is simple: open a photo, say “Create an album for Sarah,” and the app finds other photos of that person. This feature consists of 2 main AI steps: face detection and face recognition.
Face Detection
The first step is face detection. Face detection does not identify who a person is; it answers: where are the faces in this image?
The app uses the Google ML Kit face detection model for this task. ML Kit returns information about each face including the bounding box, head rotation, and facial landmarks such as the eyes, nose, and mouth positions.
The app stores the result in its own database format instead of storing ML Kit objects directly. This is the data the app is storing:
- Face Detections: where each face is detected with photo ID and bounding box.
- Face Detection Status: which photos have been scanned.
- Face Embeddings: the numeric face vectors created by MobileFaceNet.
- People: named people such as “Sarah”, mapped to embeddings.
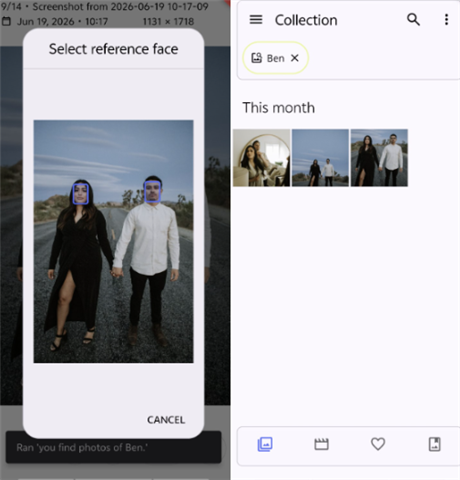
Figure 7: Face detection for group photo and virtual album for Ben
Face Recognition
After face detection, MobileFaceNet creates a face embedding. An embedding is a compact numeric representation of a face. It is not the original image or a person’s name. It is a vector that enables the app to compare one detected face with another.
For each detected face, the app crops the face region from the image and adds a small margin around it. It then resizes the image to the model’s input size, runs MobileFaceNet, normalizes the output vector, and stores the embedding in the database. This preprocessing is necessary because the model expects all input faces to have the same size and numeric format. Resizing can slightly change the crop, so the app adds padding to create a square image before resizing.
When the user creates a person's album, the selected face becomes the reference embedding. The app compares the reference embedding with other embeddings using cosine similarity. If a photo contains more than 1 detected face, the app keeps the face with the highest similarity score.
Segmentation and Inpainting: SqueezeSAM + MiGAN
The next group of features focuses on regions within an image. Commands such as "Remove this object" or "Make the background transparent" require the app to understand which pixels belong to the object or region being edited. This process is called segmentation.
The project uses SqueezeSAM for segmentation. The model receives the image and a point prompt, then predicts a pixel mask for the selected object or region.
The raw model output still requires post-processing. SqueezeSAM produces logits, which are raw prediction values. The app converts the logits into probabilities using a sigmoid function, applies a threshold, and generates a binary mask. Pixels above the threshold are selected, while pixels below it are excluded. The app can also invert the mask because many editing operations require the opposite of the selected object.
Once the app identifies the region to remove, it uses MiGAN for inpainting. Figure 7 shows the object removal flow. Inpainting uses AI to fill a missing region of an image by using the surrounding pixels as context.
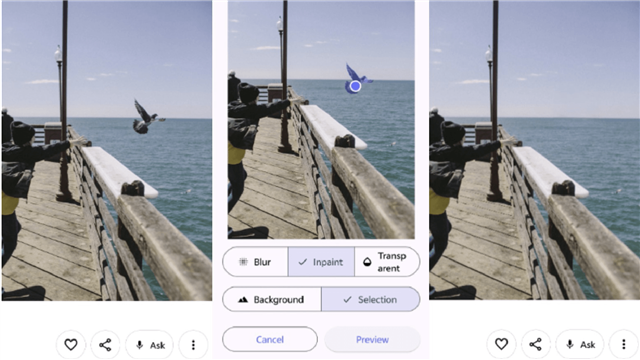
Figure 8: Background inpainting flow
Background Editing
Background editing reuses the same segmentation pipeline. If SqueezeSAM selects the foreground subject, the app can invert the mask to isolate the background.
For background blur, the app creates a blurred version of the image and combines it with the original. Foreground pixels remain sharp while background pixels come from the blurred copy.
For a transparent background, the app uses the inverted mask to remove the background alpha channel and saves the result as a PNG file to preserve the transparency.
Although the user simply says, “Blur the background,” the AI assistant performs segmentation, mask inversion, compositing, preview generation and saving behind the scenes.
Benchmarking
|
Function |
Model |
Baseline (ms) |
SME2 on (ms) |
Difference |
|
Speech to text |
SenseVoice ONNX |
957 |
824 |
1.16x faster |
|
Function call |
Qwen2.5 0.5B Instruct |
41.8 |
30.9 |
1.35x faster |
|
Image Segmentation |
SqueezeSAM |
2252 |
488 |
4.6x faster |
As shown in the table above, the entire pipeline runs faster on an SME2-capable mobile device. The largest improvement is the SqueezeSAM segmentation which is 4.6x faster. As before, the speech-to-text test uses 10 seconds of audio. In practice, voice commands are much shorter, typically1 to 3 seconds, meaning that even more complicated commands are executed in less than 1 second on SME2-capable mobile devices.
Next Steps
The assistant already supports a focused set of gallery actions, but there are several areas for improvement.
The first area is command parsing. Qwen2.5-Instruct works well for converting short user commands into JSON tool calls, however, the app still needs to validate and clean up the model's output before running a command. In the future, more capable edge-sized models that are optimized for function calling, such as FunctionGemma, could reduce the need for post-processing. However, FunctionGemma is not currently available in China.
For this project, Qwen2.5-Instruct was a practical choice because it supports the target use case, runs locally, and is well suited to the app’s multilingual requirements.
I would also like to add more assistant actions, such as:
- Implement beauty filter
- Add more image editing filters
- Add auto photo enhancement feature
Lastly, the project connects several areas, if you want to learn more checkout:
- Add an LLM to your Android app with Arm's AI Chat library
- Accelerate multimodal Voice Assistant performance with KleidiAI and SME2
- Run LLM inference on Android with KleidiAI, MediaPipe, and XNNPACK
- Build an Android chat app with Llama, KleidiAI, ExecuTorch, and XNNPACK
If you would like to know more about SME 2, try:
- Profile ONNX model performance with SME2 using KleidiAI and ONNX Runtime
- Accelerating on-device ML inference with ExecuTorch and Arm SME2

By Lin Xu
Re-use is only permitted for informational and non-commercial or personal use only.
